Intro
Our aim with writing a book
is to comprehensively document
everything we learned
while building the @dwyl
App
and
API
in a single place.
This is the
handbook
we wish we had
when we started our journey.
Our goal is to have a book
that anyone can use
to learn exactly how we build/built
every aspect of our App.
We have already written over
100 stand-alone tutorials
for various technologies/tools/frameworks.
See:
dwyl?q=learn
The advantage of
standalone/self-contained tutorials
is that they are
focussed on one thing.
The disadvantage
is that they lack clear progression.
So people can be left asking:
"What next?" 🤷♀️
By contrast the objective in the book
is to have a very clear progression.
If you click the "Print" icon in the top-right of this screen: ↗️

You can save a PDF copy of the book
and read it offline in your own time
without any distractions.
Or if you have good internet,
you can follow along
and build the App step-by-step.
One day, all software will be Open Source. This is our small contribution to that end.
If you agree with the idea
that software should be Open to anyone,
please let us know! 🙏
"Star" the repo on GitHub
dwyl/book ⭐
With that out of the way, let's get started learning by doing! 🚀
Fields Guide
This chapter is a complete beginner's guide
to building a fully-functional Web Application
in Phoenix
using fields
to appropriately store personal data.
Why?
Building secure web applications that respect people's privacy by considerately storing personal data is an essential skill.
Most beginner's guides gloss over the steps we are about to take together. If you care about your own privacy - and you should! - follow along and see how easy it is to do the right thing.
Why Build This Demo App First?
Simple: to showcase how straightforward it is to transparently validate, encrypt and decrypt sensitive personal data in an ultra-basic but fully-functional web app.
We will then use these techniques to build something more advanced.
What?
The fields-demo App
showcases a registration form
for a (fictitious) conference called "Awesome Conf".
It covers all the steps necessary
to build the form
using the fields package
to securely store personal data.
Who?
This guide is for anyone wanting a rigorous approach to building an App that collects/stores personal data.
How?
Let's get started by setting up the Phoenix project!
New Phoenix Project Setup
These are the steps we took when creating
the fields-demo Phoenix project.
You can follow along at your own pace.
And/or use them as the basis for your own App(s).
If you feel we have skipped a step or anything is unclear, please open an issue.
1. Create a New Phoenix App
Create a New Phoenix App:
mix phx.new fields_demo --no-mailer --no-dashboard --no-gettext
Note: The "flags" (e.g:
--no-mailer) after thefields_demoapp name are there to avoid adding bloat to our app. We don't need to senddashboardortranslationin thisdemo. All these advanced features are all covered in depth later.
2. Setup Coverage
So that we know which files are covered by tests, we setup coverage following the steps outlined in: /dwyl/phoenix-chat-example#13-what-is-not-tested
Note: This is the first thing we add to all new
Elixir/Phoenixprojects because it lets us see what is not being tested. 🙈 It's just a good engineering discipline/habit to get done; a hygiene factor like brushing your teeth. 🪥
With that setup we can now run:
mix c
We see output similar to the following:
.....
Finished in 0.07 seconds (0.03s async, 0.04s sync)
5 tests, 0 failures

Randomized with seed 679880
----------------
COV    FILE                                        LINES RELEVANT   MISSED
  0.0% lib/fields_demo.ex                              9        0        0
 75.0% lib/fields_demo/application.ex                 36        4        1
  0.0% lib/fields_demo/repo.ex                         5        0        0
100.0% lib/fields_demo_web.ex                        111        2        0
 15.9% lib/fields_demo_web/components/core_comp      661      151      127
  0.0% lib/fields_demo_web/components/layouts.e        5        0        0
100.0% lib/fields_demo_web/controllers/error_ht       19        1        0
100.0% lib/fields_demo_web/controllers/error_js       15        1        0
100.0% lib/fields_demo_web/controllers/page_con        9        1        0
  0.0% lib/fields_demo_web/controllers/page_htm        5        0        0
  0.0% lib/fields_demo_web/endpoint.ex                47        0        0
 66.7% lib/fields_demo_web/router.ex                  27        3        1
 80.0% lib/fields_demo_web/telemetry.ex               92        5        1
100.0% test/support/conn_case.ex                      38        2        0
 28.6% test/support/data_case.ex                      58        7        5
[TOTAL]  23.7%
----------------
Not great.
But most of the untested code is in:
lib/fields_demo_web/components/core_components.ex
which has 661 lines
and we aren't going to use in this project ...
2.1 Ignore Unused "System" Files
Create a file with called coveralls.json
and add the following contents:
{
  "coverage_options": {
    "minimum_coverage": 100
  },
  "skip_files": [
    "lib/fields_demo/application.ex",
    "lib/fields_demo_web/components/core_components.ex",
    "lib/fields_demo_web/telemetry.ex",
    "test/"
  ]
}
Save the file.
This sets 100% coverage as our minimum/baseline
and ignores the files we aren't reaching with our tests.
Re-run:
mix c
And you should see the following output:
.....
Finished in 0.05 seconds (0.01s async, 0.04s sync)
5 tests, 0 failures

Randomized with seed 253715
----------------
COV    FILE                                        LINES RELEVANT   MISSED
100.0% lib/fields_demo.ex                              9        0        0
100.0% lib/fields_demo/repo.ex                         5        0        0
100.0% lib/fields_demo_web.ex                        111        2        0
100.0% lib/fields_demo_web/components/layouts.e        5        0        0
100.0% lib/fields_demo_web/controllers/error_ht       19        1        0
100.0% lib/fields_demo_web/controllers/error_js       15        1        0
100.0% lib/fields_demo_web/controllers/page_con        9        1        0
100.0% lib/fields_demo_web/controllers/page_htm        5        0        0
100.0% lib/fields_demo_web/endpoint.ex                47        0        0
100.0% lib/fields_demo_web/router.ex                  23        2        0
[TOTAL] 100.0%
----------------
Now we can move on!
3. Run the Phoenix App!
Before we start adding features,
let's run the default Phoenix App.
In your terminal, run:
mix setup
mix phx.server
Tip: we always create an alias for
mix phx.serverasmix sThe alias will be used for the remainder of this guide.
With the Phoenix server running,
visit
localhost:4000
in your web browser,
you should see something similar to the following:
That completes 2 minutes of "setup".
Let's add a schema to store the data!
Create attendee schema
The goal is to allow people attending Awesome Conf - the attendees -
to submit the following data:
first_name- how we greet you. Will appear on your conference pass.last_name- your family name. Will appear on you conference pass.email- to confirm attendancephone_number- to verify your access when attending the secret event.address_line_1- so we can send the welcome pack and prizesaddress_line_2- if your address has multiple lines.postcode- for the address.gender- for venue capacity planning.diet_pref- dietary preferences for meals and snacks provided at the conference.website- share your awesomeness and have it as a QR code on your conference pass.desc- brief description of your awesome project.feedback- Feedback or suggestions
4.1 gen.live
Using the
mix phx.gen.live
command,
run:
mix phx.gen.live Accounts Attendee attendees first_name:binary last_name:binary email:binary phone_number:binary address_line_1:binary address_line_2:binary postcode:binary gender:binary diet_pref:binary website:binary desc:binary feedback:binary
You should expect to see output similar to the following:
* creating lib/fields_demo_web/live/attendee_live/show.ex
* creating lib/fields_demo_web/live/attendee_live/index.ex
* creating lib/fields_demo_web/live/attendee_live/form_component.ex
* creating lib/fields_demo_web/live/attendee_live/index.html.heex
* creating lib/fields_demo_web/live/attendee_live/show.html.heex
* creating test/fields_demo_web/live/attendee_live_test.exs
* creating lib/fields_demo/accounts/attendee.ex
* creating priv/repo/migrations/20230928032757_create_attendees.exs
* creating lib/fields_demo/accounts.ex
* injecting lib/fields_demo/accounts.ex
* creating test/fields_demo/accounts_test.exs
* injecting test/fields_demo/accounts_test.exs
* creating test/support/fixtures/accounts_fixtures.ex
* injecting test/support/fixtures/accounts_fixtures.ex

Add the live routes to your browser scope in lib/fields_demo_web/router.ex:

    live "/attendees", AttendeeLive.Index, :index
    live "/attendees/new", AttendeeLive.Index, :new
    live "/attendees/:id/edit", AttendeeLive.Index, :edit

    live "/attendees/:id", AttendeeLive.Show, :show
    live "/attendees/:id/show/edit", AttendeeLive.Show, :edit


Remember to update your repository by running migrations:

    $ mix ecto.migrate
Those are a lot of new files. 😬 Let's take a moment to go through them and understand what each file is doing.
lib/fields_demo_web/live/attendee_live/show.ex
https://en.wikipedia.org/wiki/List_of_gender_identities
auth
We built a complete cohesive auth system
because nothing we found
met our requirements
for simplicity, security and speed.

Read our reasoning and journey in the next few pages.
At the very least you can see if you agree (or not) with our approach.
As always, your feedback is very much welcome. 🙏
Why Custom Build Auth?
After a couple of decades of writing code and studying 30+ CMS/Frameworks & Enterprise Auth providers we concluded that all the Authentication/Authorization systems are still way too complex and required far too many steps.
Rather than lock ourselves into something complex and then be stuck with slow/no progress, we decided to build something from scratch that would allow us to move much faster in the long run.
We have documented all the steps taken
in creating our auth system.
The code is well tested and maintained
so anyone can read how it all works.
The Best Way to Understand Something is to Build It!
We encourage anyone interested
in understanding
how things work behind the scenes
to read through the auth chapters.
We've attempted to include all the steps
we took so that anyone can grok it.
However we know this is not the most exciting
part of the application stack.
If you prefer to skip the auth section entirely,
you can just use it
and treat it as a "service" that "Just WorksTM"
and only refer to specific parts when needed.
Why Re-build Auth?
We learned a lot from building our first version
of auth in Elixir.
Our "Version 1" has been working in production for several years
and thousands of people have used it successfully.
The UI/UX for the "end-user" is fine;
it's fast and already does what we need.
We aren't going to change what the person using auth
see very much in the next iteration.
What is not fine is the maintainability
and thus extensibility of the project.
We recently saw this when we tried
to add a new feature to auth,
but we saw Ecto constraint errors.
What Are We Building?
We are building a complete authentication system
that anyone can use
to protect the personal data
of the people using an App.
While we are starting from scratch
with zero code,
we aren't working in a vacuum
or blinkered/blindfolded.
We have build auth
before in PHP, Python
JavaScript/TypeScript
and most recently
Elixir
and have used
and studied
several auth systems.
This is an
otaku
for us;
an obsession
not just a side-project.
If you feel that the UI/UX
of authentication is one
of the most important aspects
of building any App,
please read on.
Starting Point?
As noted above,
we are starting from scratch
so there is zero "baggage" or "legacy",
but we are informed by our previous iterations of auth.
Let's start by picking holes in our previous design.
Note: the objective of analysing our own code/design is not "criticism", it's reflection, learning and continuous improvement.
Old Databse Entity Relational Diagram (ERD)
This is the ERD of the old version of auth:
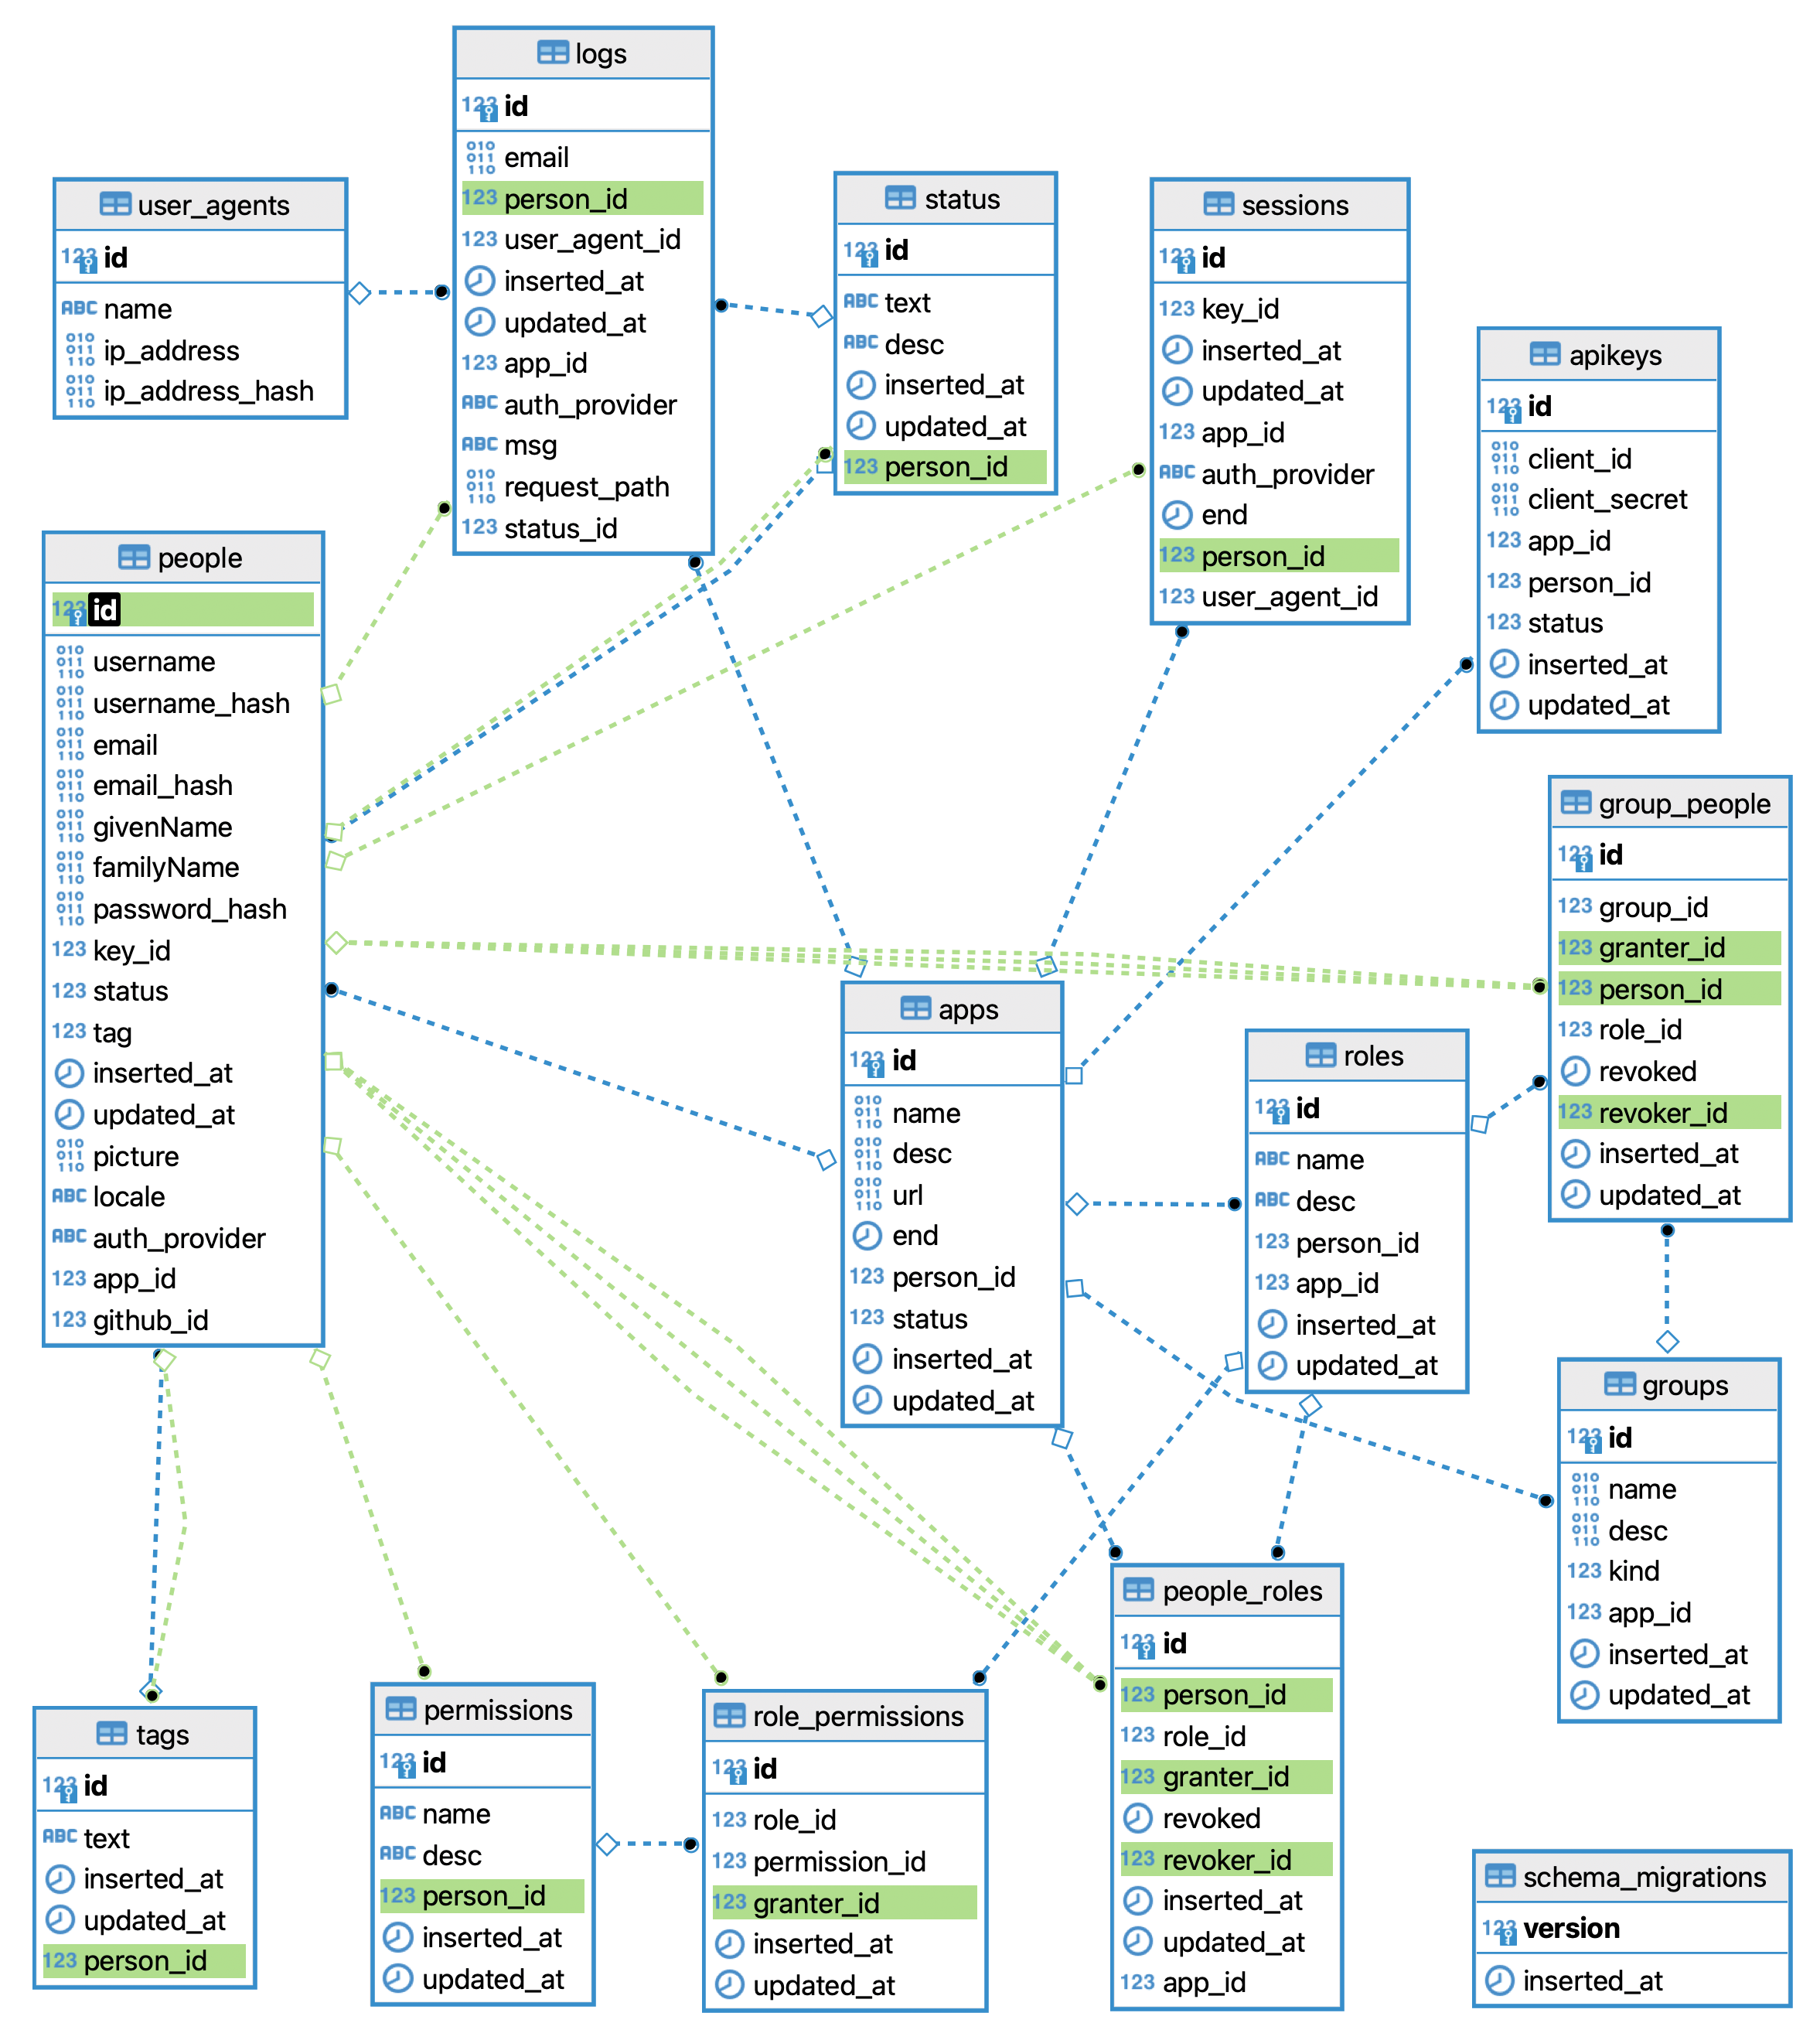
If this diagram looks "complicated" to you right now,
don't worry, we agree!
We're only sharing it here as a reference.
It is not the "goal" to recreate this.
Rather, our objective is to simplify it
and remove any tables that we don't need.
For example:
we will remove the
tags, status, roles
tables from the database
and instead define these exclusively in code.
The reasoning is simple:
this data does not change very often.
So having it in Postgres and forcing
a join for every query that requires the data
is immensely resource-wasteful.
Yes, the database purists would say: "all data should be in the database". And "old us" would agree with that dogma. But what we've discovered in practice, is that we can define metadata in code and significantly improve both reasoning about the entity relationships and query performance.
Database Schema Review
If you prefer to start with a blank slate, feel free to skip this page.
Final snapshot of diagram:
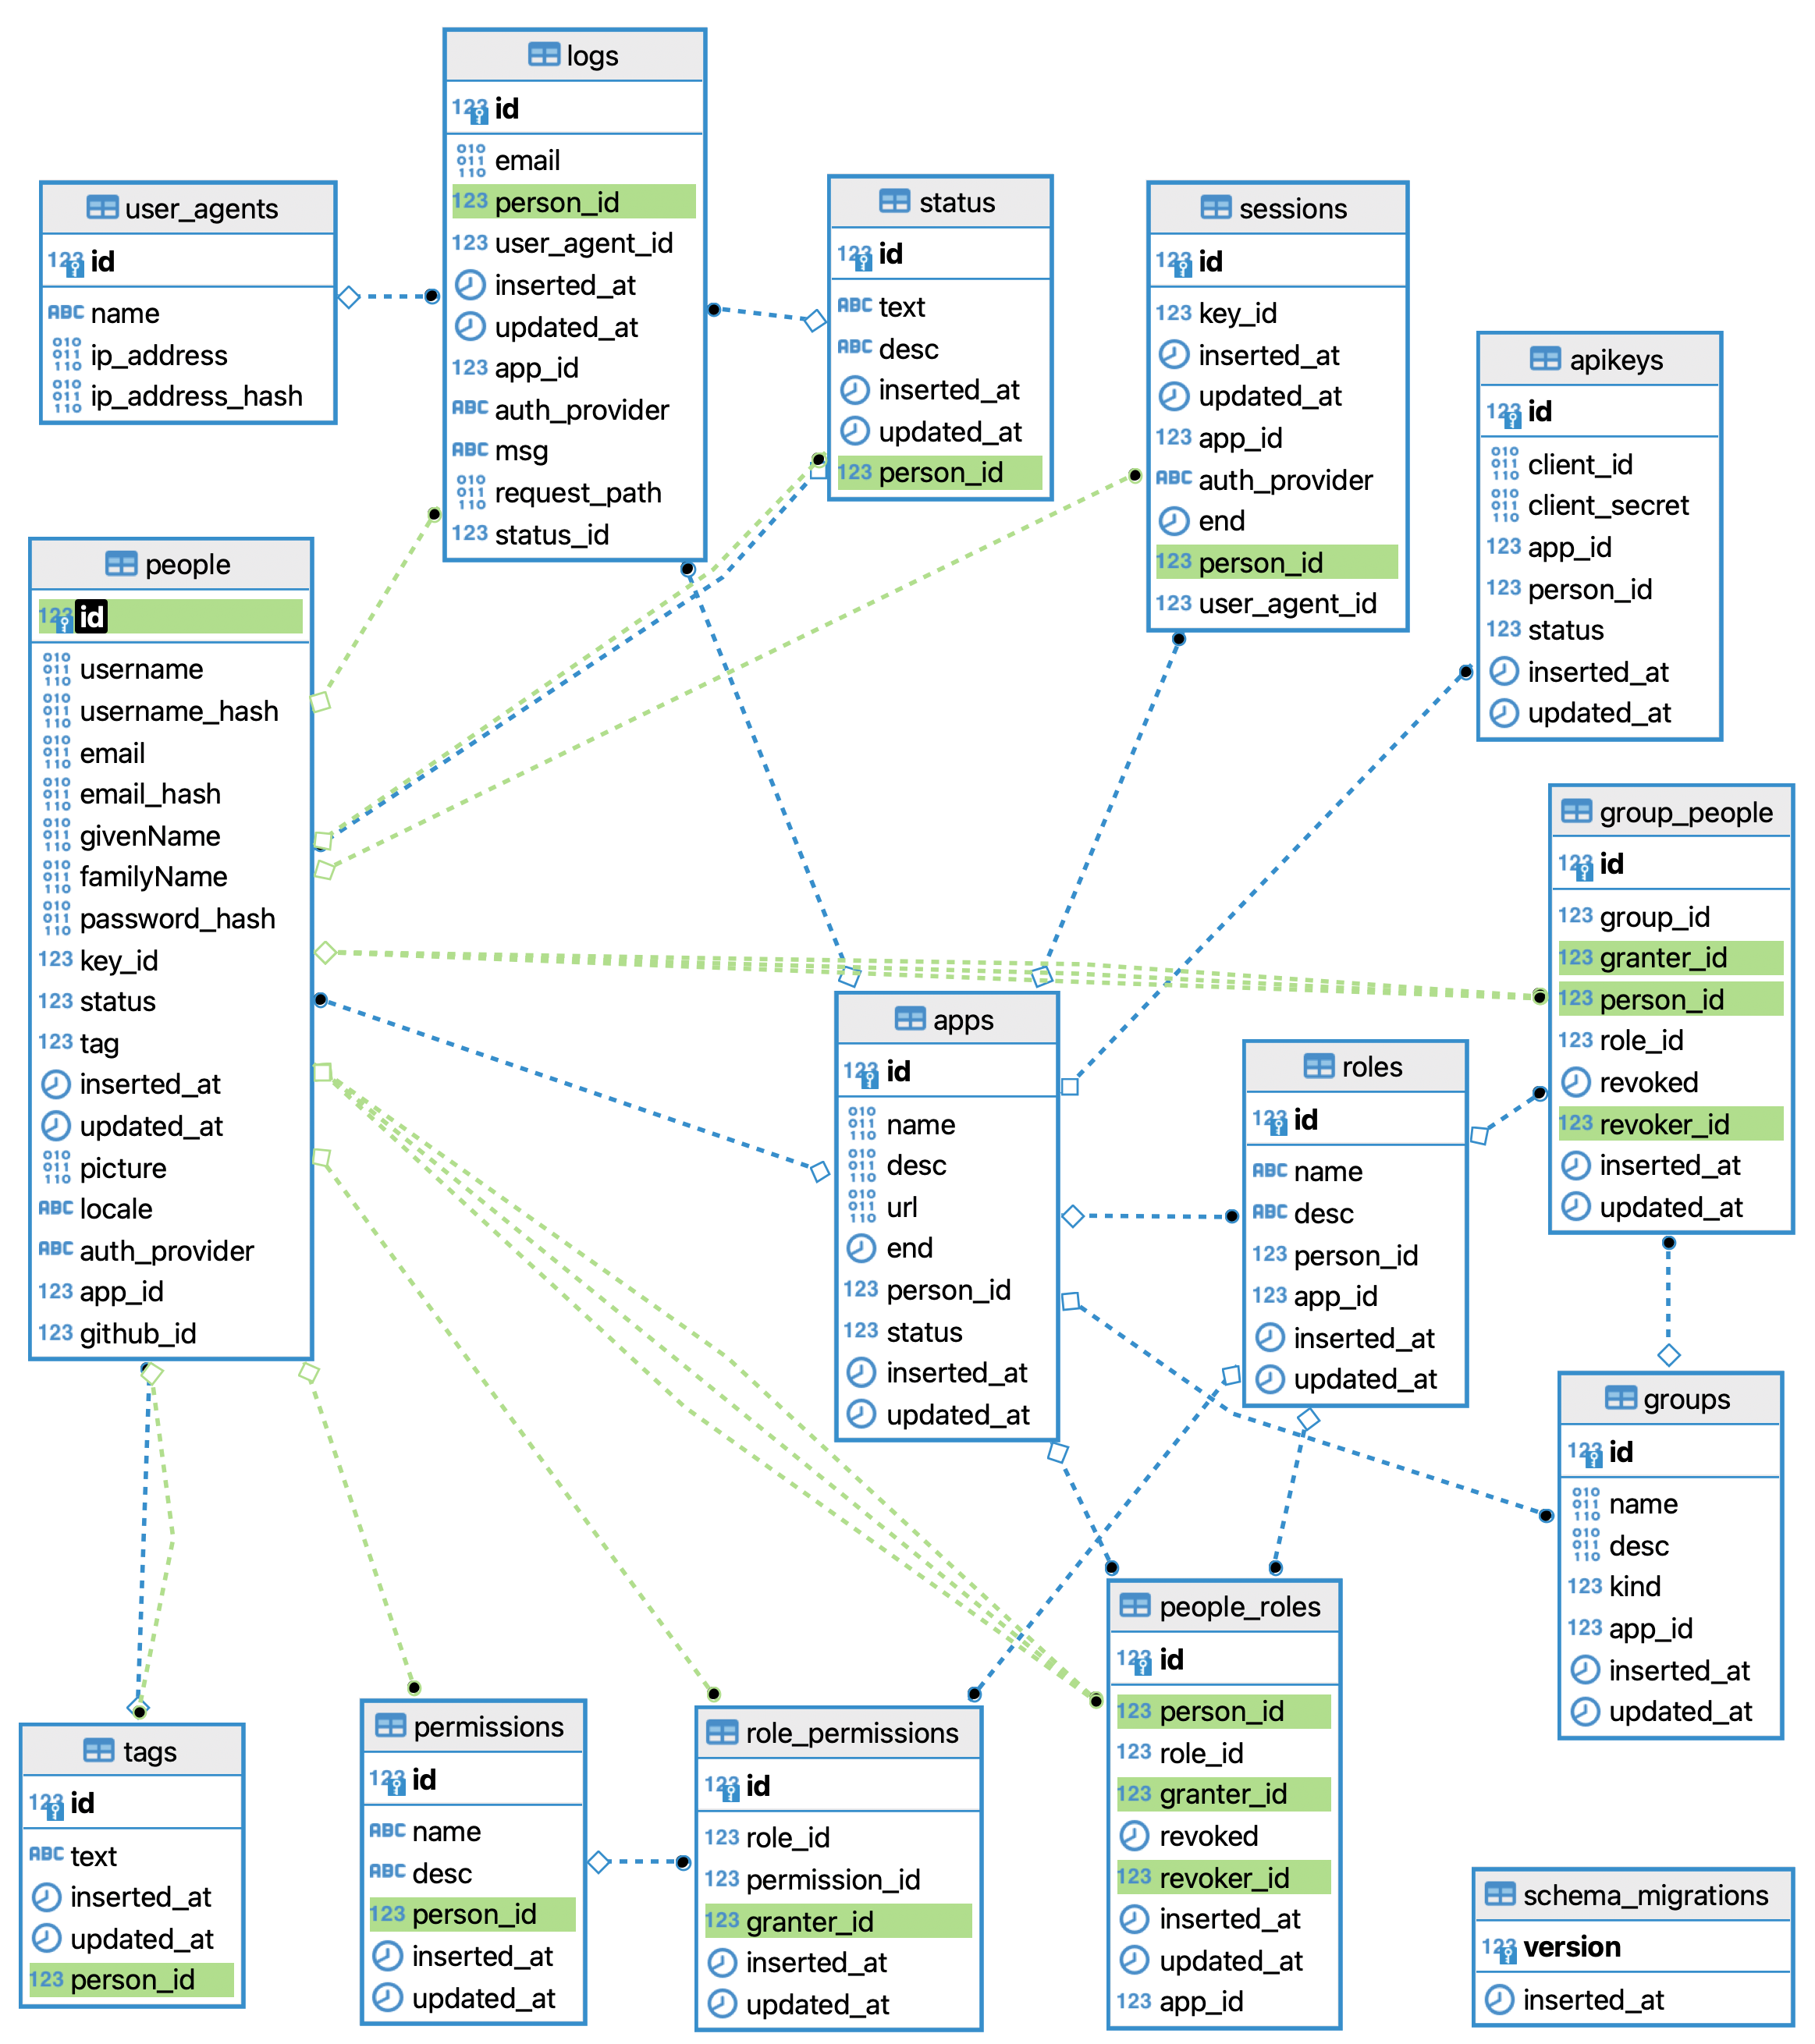
Without much knowledge of database schemas,
if you just pay close attention,
you'll see that that the person_id relationship (foreign key)
is not correctly defined on 3 tables: apikeys, apps and roles.

This has caused me/us no end of pain while trying to add new features ... auth/pull/231
So, in addition to dramatically simplifying the database schema,
I will make sure that all the Ecto relationships are well-defined
so that we don't run into annoying constraint errors in the future.
If we start by deleting the tables that we don't need, we immediately simplify the ERD:

If we manually edit the diagram to include the person_id links (foreign keys):

It becomes clearer what data "belongs" to a person.
But we can immediately spot something that incomplete/incorrect:
who does a group "belong" to? 🤷♂️
Obviously it's "unfair" to pick holes in a feature that is incomplete. But it's "broken" and we (I) need to learn from it. 💭
How To Build Auth From First Principals
For the past 2 iterations,
we have use the Phoenix Web Application framework
to build our Auth system.
The reasons for this choice
are outlined in:
dwyl/technology-stack#phoenix
so won't be repeat it here.
Phoenix is a "batteries included" framework
that includes many features out-of-the-box.
Our Auth system is a standalone Phoenix instance
that has its' own separate database.
This is a very deliberate choice.
We want to enforce a complete
separation of concerns
between Auth
and the App that uses Auth.
@TODO: insert diagram illustrating relationship between Auth and App.
Beyond the security benefits
of separating Auth
the practical rationale is simple:
the code for building an Auth system
is
~3kloc
see:
wikipedia.org/Source_lines_of_code
If we include all the Auth code in our main App
it adds to the complexity of the App
and thus increase the time
it takes someone to
grok.
The longer it takes people to understand the App code
the less likely they are to contribute to the App.
Note: we are not suggesting that people should not also
tryto understand whatAuthis doing. On the contrary we want as many people as possible to understand all aspects of our stack. However we acknowledge thatAuthand "People Management" is not the most interesting part of the stack. It's akin to the "plumbing" in your home. Absolutely necessary and needs to function flawlessly. But not something you actively think about unless there's something that isn't working as expected ...
Prerequisites
Before you start building auth,
ensure that you have the following on your computer:
Latest Elixir
In your terminal, run the following command:
elixir -v
You should see output similar to the following:
Erlang/OTP 25 [erts-13.1.4] [64-bit] [smp:10:10] [async-threads:1] [jit] [dtrace]

Elixir 1.14.3 (compiled with Erlang/OTP 25)
This is the latest and greatest version
of Elixir and OTP
at the time of writing.
github.com/elixir-lang/elixir/tags
Note: if you have a later version, please consider creating a
Pull Requestto update this section of the book.
Latest Phoenix
Visit:
github.com/phoenixframework/phoenix/tags
to remind yourself
of what the most recent version of Phoenix is.
I our case, v1.7.0,
so that's what we are using.
Confirm that you have the latest version of Phoenix
by running the command:
mix phx.new -v
You should see something similar to:
Phoenix installer v1.7.0
Note: if the version of
Phoenixyou are using is more recent than this, please help us to update our docs:
If you don't already have
the latest version of Phoenix,
run the command:
mix archive.install hex phx_new
PostgreSQL Server
Confirm PostgreSQL is running (so data can be stored) run the following command:
lsof -i :5432
You should see output similar to the following:
COMMAND  PID  USER   FD  TYPE DEVICE                  SIZE/OFF NODE NAME
postgres 529 Nelson  5u  IPv6 0xbc5d729e529f062b      0t0  TCP localhost:postgresql (LISTEN)
postgres 529 Nelson  6u  IPv4 0xbc5d729e55a89a13      0t0  TCP localhost:postgresql (LISTEN)
This tells us that PostgreSQL is "listening" on TCP Port 5432
(the default port)
If the lsof command does not yield any result
in your terminal,
run:
pg_isready
It should print the following:
/tmp:5432 - accepting connections
With all those "pre-flight checks" performed, let's fly! 🚀
Create The New Auth Phoenix Project
In an empty working directory,
using the
mix phx.new
generator,
create a new Phoenix project
called "auth":
mix phx.new auth
That will create a bunch of files.
Most of them are "boilerplate" code
for configuring the Phoenix project
and a load of components.
We will use some of them and delete
the rest.
Run the Phoenix App
Once the dependencies are installed, run the following command in your terminal:
mix setup
Once everything is setup,
run the Phoenix app
with the command:
mix phx.server
Open your web browser to:
http://localhost:4000
You should see something similar to the following:

Run the Tests
Just to confirm everything is working, run the tests with the following command:
mix test
You should see output similar to the following:
Compiling 4 files (.ex)
Generated auth app
.....
Finished in 0.1 seconds (0.05s async, 0.05s sync)
5 tests, 0 failures

Randomized with seed 50114
With that out of the way, let's build!
Generate Auth Files
In auth v1 the
mix phx.gen.auth
generator
didn't exist
so we had to hand-write all the code.
For auth v2
we are using the phx.gen.auth "generator"
to provide some of the scaffolding
and session management.
see:
hexdocs.pm/phoenix/mix_phx_gen_auth
In your terminal, run th following command:
mix phx.gen.auth Accounts Person people
The generator prompts with the following question:
An authentication system can be created in two different ways:
- Using Phoenix.LiveView (default)
- Using Phoenix.Controller only
Do you want to create a LiveView based authentication system? [Yn]
We answered N (No)
because we will be adding more advanced auth
* creating priv/repo/migrations/20230226095715_create_people_auth_tables.exs
* creating lib/auth/accounts/person_notifier.ex
* creating lib/auth/accounts/person.ex
* creating lib/auth/accounts/person_token.ex
* creating lib/auth_web/person_auth.ex
* creating test/auth_web/person_auth_test.exs
* creating lib/auth_web/controllers/person_session_controller.ex
* creating test/auth_web/controllers/person_session_controller_test.exs
* creating lib/auth_web/controllers/person_confirmation_html.ex
* creating lib/auth_web/controllers/person_confirmation_html/new.html.heex
* creating lib/auth_web/controllers/person_confirmation_html/edit.html.heex
* creating lib/auth_web/controllers/person_confirmation_controller.ex
* creating test/auth_web/controllers/person_confirmation_controller_test.exs
* creating lib/auth_web/controllers/person_registration_html/new.html.heex
* creating lib/auth_web/controllers/person_registration_controller.ex
* creating test/auth_web/controllers/person_registration_controller_test.exs
* creating lib/auth_web/controllers/person_registration_html.ex
* creating lib/auth_web/controllers/person_reset_password_html.ex
* creating lib/auth_web/controllers/person_reset_password_controller.ex
* creating test/auth_web/controllers/person_reset_password_controller_test.exs
* creating lib/auth_web/controllers/person_reset_password_html/edit.html.heex
* creating lib/auth_web/controllers/person_reset_password_html/new.html.heex
* creating lib/auth_web/controllers/person_session_html.ex
* creating lib/auth_web/controllers/person_session_html/new.html.heex
* creating lib/auth_web/controllers/person_settings_html.ex
* creating lib/auth_web/controllers/person_settings_controller.ex
* creating lib/auth_web/controllers/person_settings_html/edit.html.heex
* creating test/auth_web/controllers/person_settings_controller_test.exs
* creating lib/auth/accounts.ex
* injecting lib/auth/accounts.ex
* creating test/auth/accounts_test.exs
* injecting test/auth/accounts_test.exs
* creating test/support/fixtures/accounts_fixtures.ex
* injecting test/support/fixtures/accounts_fixtures.ex
* injecting test/support/conn_case.ex
* injecting config/test.exs
* injecting mix.exs
* injecting lib/auth_web/router.ex
* injecting lib/auth_web/router.ex - imports
* injecting lib/auth_web/router.ex - plug
* injecting lib/auth_web/components/layouts/root.html.heex

Please re-fetch your dependencies with the following command:

    $ mix deps.get

Remember to update your repository by running migrations:

    $ mix ecto.migrate

Once you are ready, visit "/people/register"
to create your account and then access "/dev/mailbox" to
see the account confirmation email.
That's a lot of code.
See the git commit:
90086a8.
We will use the session management
in our auth system
and delete some of the unused code along the way.
Migrate the Schema
When you run:
mix ecto.migrate
You will see the following output:
Generated auth app

15:04:11.168 [info] == Running 20230226095715 Auth.Repo.Migrations.CreatePeopleAuthTables.change/0 forward

15:04:11.173 [info] execute "CREATE EXTENSION IF NOT EXISTS citext"

15:04:11.285 [info] create table people

15:04:11.296 [info] create index people_email_index

15:04:11.297 [info] create table people_tokens

15:04:11.302 [info] create index people_tokens_person_id_index

15:04:11.307 [info] create index people_tokens_context_token_index

15:04:11.310 [info] == Migrated 20230226095715 in 0.1s
Schema
Let's take a quick look at the created database tables.
If you open the auth_dev
database in your Postgres GUI,
e.g:
DBEaver
and view the
ERD
there are only two tables:

Data in people and people_tokens tables
By default,
mix phx.gen.auth
does not setup any protection
for personal data in the database.
Email addresses are stored in-the-clear: 🙄

Similarly the people_tokens table stores email addresses as plaintext in the sent_to column:

This is obviously undesirable. 🙃 This is a privacy/security issue waiting to become a scandal! We will address this swiftly in the following pages.
But first, tests!
Run The Tests
Sadly, the phx.gen.auth
there to be a bunch of routes
hard-coded with the "/user" prefix in the tests
e.g:
test/auth_web/controllers/person_session_controller_test.exs#L15
The generator doesn't respect
the fact that we call them people
when we invoked the command above.
so if you run the tests:
mix test
You will see several warnings:
.warning: no route path for AuthWeb.Router matches "/users/log_out"
  test/auth_web/controllers/person_registration_controller_test.exs:40: AuthWeb.PersonRegistrationControllerTest."test POST /people/register creates account and logs the person in"/1

warning: no route path for AuthWeb.Router matches "/users/log_out"
  test/auth_web/controllers/person_session_controller_test.exs:40: AuthWeb.PersonSessionControllerTest."test POST /people/log_in logs the person in"/1

warning: no route path for AuthWeb.Router matches "/users/settings"
  test/auth_web/controllers/person_session_controller_test.exs:39: AuthWeb.PersonSessionControllerTest."test POST /people/log_in logs the person in"/1

warning: no route path for AuthWeb.Router matches "/users/settings"
  test/auth_web/controllers/person_registration_controller_test.exs:39: AuthWeb.PersonRegistrationControllerTest."test POST /people/register creates account and logs the person in"/1

warning: no route path for AuthWeb.Router matches "/users/register"
  test/auth_web/controllers/person_session_controller_test.exs:15: AuthWeb.PersonSessionControllerTest."test GET /people/log_in renders log in page"/1

warning: no route path for AuthWeb.Router matches "/users/register"
  test/auth_web/controllers/person_registration_controller_test.exs:12: AuthWeb.PersonRegistrationControllerTest."test GET /people/register renders registration page"/1

warning: no route path for AuthWeb.Router matches "/users/log_in"
  test/auth_web/controllers/person_registration_controller_test.exs:11: AuthWeb.PersonRegistrationControllerTest."test GET /people/register renders registration page"/1
And ultimately the tests fail:
...............................................................................
Finished in 0.6 seconds (0.4s async, 0.2s sync)
115 tests, 5 failures
This should be a easy to fix.
Perform a find-and-replace for "/users/" to "/people/"

Attempt to re-run the tests:
mix test
Sadly, 4 tests still fail:
  1) test POST /people/register creates account and logs the person in (AuthWeb.PersonRegistrationControllerTest)
     test/auth_web/controllers/person_registration_controller_test.exs:24
     Assertion with =~ failed
     code:  assert response =~ email
     left:  "<!DOCTYPE html>\n<html lang=\"en\" style=\"scrollbar-gutter: stable;\">\n  <head>\n etc.

etc.

.......................................................................
Finished in 0.5 seconds (0.4s async, 0.1s sync)
115 tests, 4 failures
We're going to have to investigate/update these tests manually.
Notes on Naming Conventions
The words we use matter. To some people they matter more than the message we are trying to convey. For some, if you speak or write a word that offends them (or anyone else), what you have to say is no longer relevant.
There are many words we avoid using in polite company such as profanity and others we attempt to eliminate completely such as pejorative terms or ethnic slurs.
User -> Person
The word "user" is pervasive in computing:
"A
useris apersonwho utilizes a computer or network service." ~ https://en.wikipedia.org/wiki/User_(computing)#Terminology

Right there in the definition
they clarify that a "user" is a "person" ...
so why not just call them a person?
The fact that the term "user" is widely used
doesn't make it right;
it's just the default word
many people have become accustomed to.
Mega tech companies like Apple, Microsoft, Google and Facebook
regularly use the word "user" or "users"
to describe the people that use their products and services.
Personalization?
Consider the word personalization.
"Personalization consists of tailoring
a service or a product
to accommodate specific individuals,
sometimes tied to groups or segments of individuals."
~ wikipedia.org/wiki/Personalization
The word isn't "userization", because the interface for the "user" is always the same; generic. Whereas the interface that is personalized to an individual person is just for them.
We will be doing a lot of personalization
in our App
and building tools that allow people
to personalize their own experience.
Complete Clarity
We avoid using the word "user"
in the auth system and our App
because we consider it reductive
and distances the people creating the code
from the people using the product.
Instead we refer to people using the App
as people because it helps us
to think of them as real people.
We cannot force anyone else
to stop using the word "user".
It will still be the default for many companies.
Especially the company who
treat their "users" as the product.
The Product Facebook Sells is You

"You may think Facebook is the product and you’re the client, but that’s not entirely true. There’s a reason tech companies call us users and not customers. It’s because we’re just people who come and use the interface. The product
you. The advertisers are the customers. That goes for all tech companies that make most of their money from ads." ~ Ben Wolford
DAUs, MAUs
Facebook
will continue referring to people as "users"
and more specifically
"DAUs"
(Daily Active Users)
and
"MAUs"
(Monthly Active Users).
They don't want to think about the
people whose lives they are
wasting
and in many cases
destroying.
We want to do the exact opposite
of Facebook with our App;
we want to help people save time!
So we are using the word "people"
and avoiding "users" wherever we can.
Not Just Facebook
Facebook is just the most obvious
and egregious example.
All the top tech companies
harvest your personal data
and sell it to advertisers.
Apple,
Amazon,
Disney,
Google,
Microsoft,
NetFlix,
Twitter,
Uber
are all in the advertising business
whether you realize it or not.
They are all "attention merchants".
"Simply put, the U-words have their origin in a more sanguine, naïve era. As terms, I find them unethical and outdated, and so I have doubts they can usher in the kind of improvements to technology we desperately need." ~ Adam Lefton

Recommended Reading
- Words Matter. Talk About People: Not Customers, Not Consumers, Not Users: jnd.org/words_matter_talk_about_people_not_customers_not_consumers_not_users
- Refuse to Call People ‘Users’: medium.com/s/user-friendly/why-im-done-saying-user-user-experience-and-ux-in-2019-4fdfc6b7de23
- Is Your Life Really Yours? How ‘The Attention Merchants’ Got Inside Our Heads: bigthink.com/high-culture/tim-wu-on-the-attention-merchants-2
- The words you choose within your app are an essential part of its experience: developer.apple.com/design/human-interface-guidelines/foundations/writing
Note:
Apple**while a proponent of carefully selecting words, often refer to thepeoplethat buy and use their products and services as "users". This is a legacy of their age as a company - they have been around since 1976 - and their scale; they have more than 2 billion active devices. At that scale it's about numbers and "users" not individualpeople. There are many greatpeopleatApplewho understand that words matter. If the company was started today perhaps they would think twice about the "users" word. But sadly, even Apple are now in the advertising business: wired.co.uk/article/apple-is-an-ad-company-now So they aren't likely to update the word they use to describe us.
Modals Are An Experience Antipattern
"An antipattern is just like a pattern, except that instead of a solution it gives something that looks superficially like a solution, but isn't one." ~ Linda Rising - The Patterns Handbook wikipedia.org/wiki/Anti-pattern
9 times out of 10
when designers/egineers
employ a modal in an App.
they are doing so inappropriately
and inadvertently making
the experience/interface worse
for the person.
If you are unfamiliar with them, a good place to learn is: bootstrap.com/modal

A modal overlays information
on top of what is already displayed on the page.
It hijacks the person's focus
to what the dev wants them to see
and requires the person
to manually dismiss it
before being allowed to resume what they were doing.
This is an unwelcome interruption
to the flow and a generally horrible experience.
Modals are a relic of the old web
where ads hijacked people's screens with pop-ups:

The situation got completely out-of-hand
and made browsing the web a horrible experience.
All modern browsers block pop-ups by default now
but designers/devs who don't respect
the people using their site/app
still reach for modals for hijacking attention.

Modals are almost never a good way of displaying information.
Modals in Phoenix?
Phoenix 1.7 added the new
modal
component.
We really wish the creators of Phoenix
had not done it
because it will inevitably be misused.
Naive devs who mean well
but haven't studied UX,
will use a modal
when a basic <div>
would be considerably better.
It is used by default for inserting new content:

This is a horrible experience.
The New Item modal overlays the Listing Items page
instead of just showing a New Item page.
This adds absolutely no value to the person
inputing the item;
it's just a distraction.
This shows that the devs building
Phoenix have not done very much UX/Usability testing
because this would immediately confuse
an older less tech-savvy person.
They would ask is this page "Listing Items"
or is it allowing me to create a "New Item"?
And if they accidentally clicked/tapped
on the "X" they would lose the text they inputted.
Horrible.
Quick Example
After executing the mix phx.gen.auth command
and then running the project with:
mix phx.server
The following 2 links
are added to the header
of home page:

The code that creates these links is: /lib/auth_web/components/layouts/root.html.heex#L15-L55
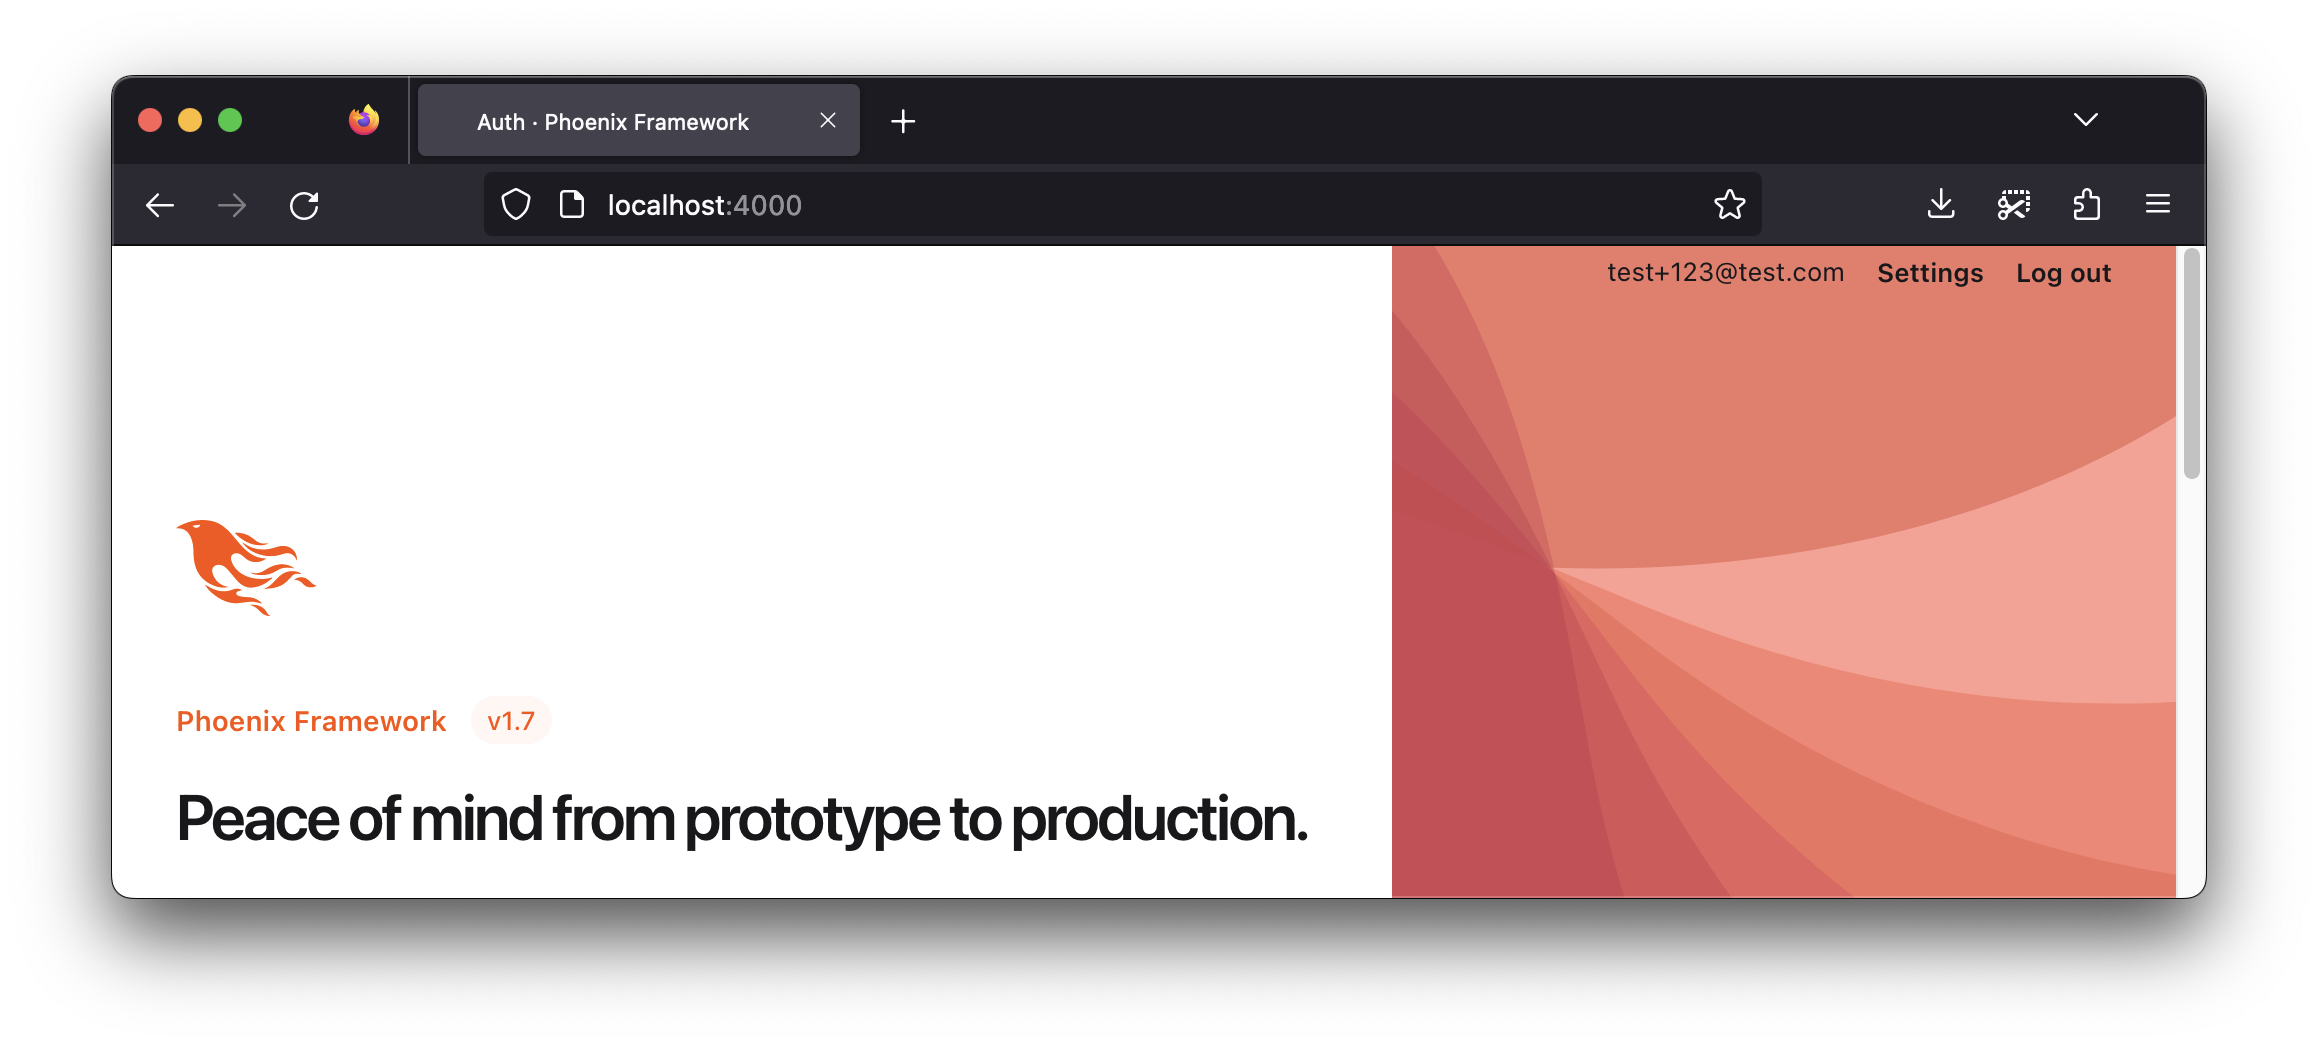
Clicking on the register link we navigate to: http://localhost:4000/people/register

Here we can enter an Email and Password to and click on the Create an account button:

This redirects us back to the homepage http://localhost:4000/ and we see the following modal:

The person viewing this screen
has to manually dismiss
the modal in order to see
the content that is relevant to them:

Inspecting the DOM of the page in our browser:

We see that the <div id="flash"
has the following HTML:
<div id="flash" phx-mounted="[["show",{"display":null,"time":200,"to":"#flash","transition":[["transition-all","transform","ease-out","duration-300"],["opacity-0","translate-y-4","sm:translate-y-0","sm:scale-95"],["opacity-100","translate-y-0","sm:scale-100"]]}]]" phx-click="[["push",{"event":"lv:clear-flash","value":{"key":"info"}}],["hide",{"time":200,"to":"#flash","transition":[["transition-all","transform","ease-in","duration-200"],["opacity-100","translate-y-0","sm:scale-100"],["opacity-0","translate-y-4","sm:translate-y-0","sm:scale-95"]]}]]" role="alert" class="fixed hidden top-2 right-2 w-80 sm:w-96 z-50 rounded-lg p-3 shadow-md shadow-zinc-900/5 ring-1 bg-emerald-50 text-emerald-800 ring-emerald-500 fill-cyan-900" style="display: block;">
<p class="flex items-center gap-1.5 text-[0.8125rem] font-semibold leading-6">
<svg xmlns="http://www.w3.org/2000/svg" aria-hidden="true" class="h-4 w-4" fill="currentColor" viewBox="0 0 20 20">
<path fill-rule="evenodd" d="M18 10a8 8 0 11-16 0 8 8 0 0116 0zm-7-4a1 1 0 11-2 0 1 1 0 012 0zM9 9a.75.75 0 000 1.5h.253a.25.25 0 01.244.304l-.459 2.066A1.75 1.75 0 0010.747 15H11a.75.75 0 000-1.5h-.253a.25.25 0 01-.244-.304l.459-2.066A1.75 1.75 0 009.253 9H9z" clip-rule="evenodd"></path>
</svg>
Success!
</p>
<p class="mt-2 text-[0.8125rem] leading-5">Person created successfully.</p>
<button type="button" class="group absolute top-2 right-1 p-2" aria-label="close">
<svg xmlns="http://www.w3.org/2000/svg" aria-hidden="true" class="h-5 w-5 stroke-current opacity-40 group-hover:opacity-70" fill="currentColor" viewBox="0 0 24 24">
<path fill-rule="evenodd" d="M5.47 5.47a.75.75 0 011.06 0L12 10.94l5.47-5.47a.75.75 0 111.06 1.06L13.06 12l5.47 5.47a.75.75 0 11-1.06 1.06L12 13.06l-5.47 5.47a.75.75 0 01-1.06-1.06L10.94 12 5.47 6.53a.75.75 0 010-1.06z" clip-rule="evenodd"></path>
</svg>
</button>
</div>
This is a lot of code
just to inform the person
that the successfully registered.
We know there's a much better way. We will be demonstrating it in the next few pages.
For now, we're just going to remove the line:
<.flash_group flash={@flash} />
From the file:
/lib/auth_web/components/layouts/app.html.heex#L40
To remove all flash modals.
And just like magic,
the tests that were failing previously,
because the modal (noise)
was covering the email address,
now pass:
mix test

Compiling 2 files (.ex)
The database for Auth.Repo has already been created

19:08:47.892 [info] Migrations already up
..........................................................
.........................................................
Finished in 0.5 seconds (0.3s async, 0.1s sync)
115 tests, 0 failures
With all tests passing,
we can finally get on
with building Auth!
Encrypt Personal Data
As previously noted
the schema created by the
phx.gen.auth generator
leaves email addresses stored
as
plaintext:
It's disappointing to us
that this is the default
and many devs
will naively think this is "OK".
It's Never "OK" to Store Personal Data as plaintext
It might be tempting to store personal data as human-readable text during development to make it easier to debug, but we urge everyone to resist this temptation! Data breaches happen every day. Breaches can destroy the reputation of a company. Thankfully, the EU now has stronger laws in the form of the General Data Protection Regulation (GDPR), which carry heavy fines for companies that improperly store personal data.
Most software engineers don't consider the law(s) around data protection but none of us have any excuse to ignore them even in basic projects. The good news is: protecting personal data is quite straightforward.
Why Encrypt Now?
We know this might feel like a deeply technical
step to have so early on in
the creation of the auth App.
Why don't we just skip this
and focus on the interface people will see?
We feel that getting the data privacy/security
right from the start
is essential for building a robust
and therefore trustworthy app.
We will get to the interface design
in the next chapter
so if you prefer that part,
feel free to speed-read/run this
and only return to it when you
need a deeper understanding.
How To Encrypt Sensitive Data?
When we first started using Elixir in 2016
we explored the topic of
encrypting personal data in depth
and wrote a comprehensive guide:
dwyl/phoenix-ecto-encryption-example
We highly recommend following step-by-step guide
to understand this in detail.
We aren't going to duplicate/repeat
any of the theory here.
Rather we are going to focus on
the practice using
the
fields
package we created
to implement transparent encryption.
Using Fields to Automatically Encrypt Personal Data
Following the instructions in the
fields
repo, open the mix.exs file
and locate the defp deps do section
and add fields to the list:
{:fields, "~> 2.10.3"},
Save the mix.exs file and run:
mix deps.get
Create Environment Variables
fields expects an `environment variable
e.g. using the phx.gen.secret command:
mix phx.gen.secret
You should see output similar to:
XGYVueuky4DT0s0ks2MPzHpucyl+9e/uY4UusEfgyR2qeNApzoYGSH+Y55cfDj1Y
Export this key in your terminal with the following command:
export ENCRYPTION_KEYS=XGYVueuky4DT0s0ks2MPzHpucyl+9e/uY4UusEfgyR2qeNApzoYGSH+Y55cfDj1Y
Run the phx.gen.secret command again
and export it as SECRET_KEY_BASE, e.g:
export SECRET_KEY_BASE=GLH2S6EU0eZt+GSEmb5wEtonWO847hsQ9fck0APr4VgXEdp9EKfni2WO61z0DMOF
We use an .env file on localhost:
export ENCRYPTION_KEYS=XGYVueuky4DT0s0ks2MPzHpucyl+9e/uY4UusEfgyR2qeNApzoYGSH+Y55cfDj1Y
export SECRET_KEY_BASE=GLH2S6EU0eZt+GSEmb5wEtonWO847hsQ9fck0APr4VgXEdp9EKfni2WO61z0DMOF
See:
.env_sample
for a sample including
all the recommended/required environment variables
for running the auth app.
Now to the interesting part!
Update people.email Data Type
The phx.gen.auth generator
created the people schema
with the :email field defined as a :string:
field :email, :string
See:
lib/auth/accounts/person.ex#L6
Create Migration File
Using Ecto.Migration
run the following command
to create a migration file
with a descriptive name:
mix ecto.gen.migration modify_people_email_string_binary
You should see output similar to:
* creating priv/repo/migrations/20230309145958_modify_people_email_string_binary.exs
Open the file in your editor. You should see:
defmodule Auth.Repo.Migrations.ModifyPeopleEmailStringBinary do
  use Ecto.Migration

  def change do

  end
end
Update it to include the alter statement:
defmodule Auth.Repo.Migrations.ModifyPeopleEmailStringBinary do
  use Ecto.Migration

  def change do
    alter table(:people) do
      remove :email
      add :email, :binary
      add ...
    end

    alter table(:people_tokens) do
      remove :sent_to
      add :sent_to, :binary
    end
  end
end
Note: we tried using
Ecto.Migration.modify/3to modify the field type but got the error:
15:06:13.691 [info] alter table people
** (Postgrex.Error) ERROR 42804 (datatype_mismatch) column "email" cannot be cast automatically to type bytea

    hint: You might need to specify "USING email::bytea".
Given that this is a new project
and there is no data in the DB,
we decided it was easier
to remove and re-add the email column/field.
Save the migration file and run:
mix ecto.reset
You should see output similar to the following:
15:13:29.989 [info] == Migrated 20230226095715 in 0.0s

15:13:30.057 [info] == Running 20230309145958 Auth.Repo.Migrations.ModifyPeopleEmailStringBinary.change/0 forward

15:13:30.058 [info] alter table people

15:13:30.059 [info] alter table people_tokens

15:13:30.059 [info] == Migrated 20230309145958 in 0.0s
### Update person.email
Open
lib/auth/accounts/person.ex
and replace the line:
field :email, :string
With:
field :email, Fields.EmailEncrypted
field :email_hash, Fields.EmailHash
Sadly, this essential privacy/security enhancement
was not quite as straightforward as we had hoped
and had quite a few ramifications.
The boilerplate code
generated by phx.gen.auth
was relying on person.email being plaintext
so we ended up having to make several changes.
Rather than repeating all of these here
which will take up a lot of space
and duplicate the code unessessarily,
we recommend you read through the git commit:
#2bbba99
In a follow-up section
we will be removing most of this code
because we don't want to
use links in emails to verify people.
Instead we will be using one-time-numeric codes.
Following the changes made in:
#2bbba99
If we now run a query to view the data in the people table:
SELECT id, email, inserted_at FROM people;
We see that the email is now a binary blob,
i.e: encrypted:
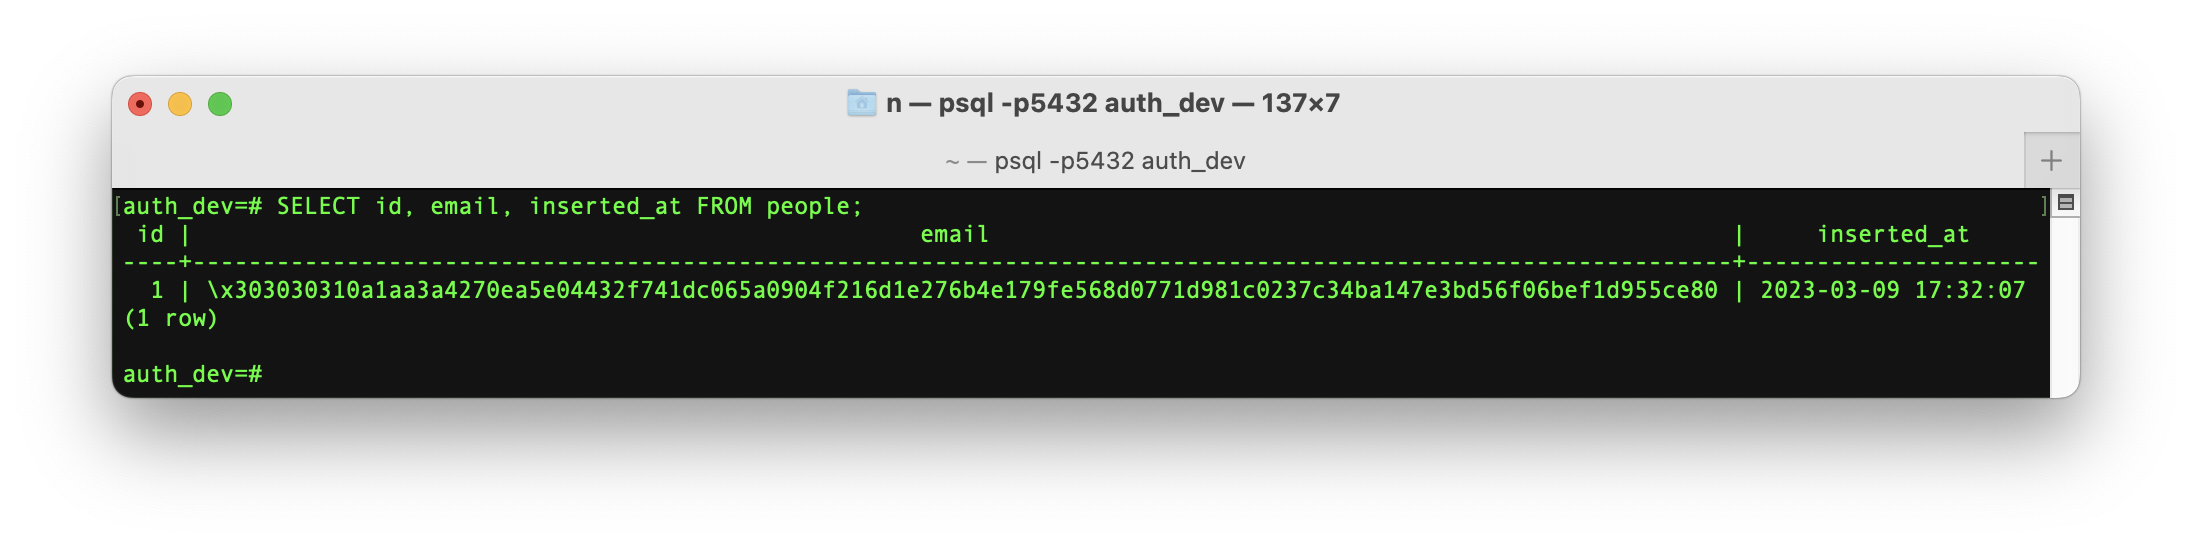
This cannot be read by anyone who does not have the encryption key. So if the database is somehow compromised, it's useless to the attacker.
Registration and Login still works as expected:
But now the personal data
captured in registration is stored
encrypted at rest
the way it should be. 🔐
Now we can get on with building auth!
How to Build an Metrics Dashboard
mix phx.new atm --no-mailer
We won't send email from this app.
But we want everything else
Phoenix has to offer. 🚀
Parse and Store Browser User Agent String
The first data we want to parse and store is the Web Browser User Agent so that we know what devices and browsers are visiting.
There is a lot of info about User Agents on MDN: developer.mozilla.org/en-US/docs/Web/HTTP/Headers/User-Agent recommended reading for the curious.
For our purposes
we only need to extract the user_agent data that interest us
and thankfully,
@mneudert
has created a handy library we can use:
ua_inspector
ua_inspector Usage Example
From the ua_inspector docs we get the following sample code/output:
iex> UAInspector.parse("Mozilla/5.0 (iPad; CPU OS 7_0_4 like Mac OS X) AppleWebKit/537.51.1 (KHTML, like Gecko) Version/7.0 Mobile/11B554a Safari/9537.53")
%UAInspector.Result{
  client: %UAInspector.Result.Client{
    engine: "WebKit",
    engine_version: "537.51.1",
    name: "Mobile Safari",
    type: "browser",
    version: "7.0"
  },
  device: %UAInspector.Result.Device{
    brand: "Apple",
    model: "iPad",
    type: "tablet"
  },
  os: %UAInspector.Result.OS{
    name: "iOS",
    platform: :unknown,
    version: "7.0.4"
  },
  user_agent: "Mozilla/5.0 (iPad; CPU OS 7_0_4 like Mac OS X) AppleWebKit/537.51.1 (KHTML, like Gecko) Version/7.0 Mobile/11B554a Safari/9537.53"
}
Additionally there is following sample output for a non-browser agent (Google Bot):
iex> UAInspector.parse("Mozilla/5.0 AppleWebKit/537.36 (KHTML, like Gecko; compatible; Googlebot/2.1; +http://www.google.com/bot.html) Safari/537.36")
%UAInspector.Result.Bot{
  category: "Search bot",
  name: "Googlebot",
  producer: %UAInspector.Result.BotProducer{
    name: "Google Inc.",
    url: "http://www.google.com"
  },
  url: "http://www.google.com/bot.html",
  user_agent: "Mozilla/5.0 AppleWebKit/537.36 (KHTML, like Gecko; compatible; Googlebot/2.1; +http://www.google.com/bot.html) Safari/537.36"
}
From this sample output we can extract the following fields:
engine:Stringe.g: "WebKit"engine_version:Stringe.g: "537.51.1" - sadly we can't store this asfloatunless we lose the last digit ...name:Stringe.g: "Mobile Safari"version:Floate.g: "7.0" - we will parse thisfloatso that we can run queries on it.brand:Stringe.g: "Apple"model:Stringe.g: "iPad"device_type:Stringe.g: "tablet"os_name:Stringe.g: "iOS"platform:Stringe.g: "unknown" -Atom.to_string(:unknown)os_version:Stringe.g: "7.0.4"url:Stringe.g: "http://www.google.com/bot.html" - used by non-human agents; blank if null.user_agent:String, the full agent string. Even thoughua_inspectordoes a good job of parsing theuser_agent, we are storing the fulluser_agentstring so that we can sense-check the parsed data when needed.
Fields we will ignore:
type:Stringe.g: "browser" - we will skip this field as it's implied.
Minimum Viable Product (MVP)
All Apps start with an MVP.
In our case we created a separate repository:
github.com/dwyl/mvp
so that the most basic version of our App
could be used as a reference by other people building MVPs.
TODO:
Lift the contents of
github.com/dwyl/mvp/BUILDIT.md
and split it into separate files here in book.
See:
dwyl/mvp/issues/350
Use cid for universally unique ids
By default all the tables
in a Phoenix Application
use an auto-incrementing integer (Serial)
for the id (Primary Key).
e.g the items table:
This is fine for a server-side rendered app
with a single relational database instance.
i.e. the server/database controls the id of records.
But our ambition has always been
to build a mobile + offline-first distributed App.
Luckily our friends at
Protocol Labs
creators of
IPFS
have done some great groundwork on
"Decentralized Apps"
so we can build on that.
We created an Elixir package
that creates IPFS compliant
Content Identifiers:
cid
The basic usage is:
item = %{text: "Build PARA System App", person_id: 2, status: 2}
Cid.cid(item)
"zb2rhn92tqTt41uFZ3hh3VPnssXjYCW4yDSX7KB39dXZyMtNC"
This cid string is unique to this content
therefore creating it on the client (Mobile device)
will generate the same cid
if the record is created offline.
We can easily confirm the validity of this cid
by inputting it into CID Inspector:
cid.ipfs.tech
e.g:
https://cid.ipfs.tech/#zb2rhn92tqTt41uFZ3hh3VPnssXjYCW4yDSX7KB39dXZyMtNC
Add excid package to deps
Add the excid package to the deps in mix.exs:
# Universally Unique Deterministic Content IDs: github.com/dwyl/cid
{:excid, "~> 1.0.1"},
Run:
mix deps.get
Then in config/config.exs add the following configuration line:
config :excid, base: :base58
We want to use
base58
because it uses 17% fewer characters to represent the same ID
when compared to base32.
"bafkreihght5nbnmn6xbwoakmjyhkiu2naxmwpxgxbp6xkpbiweuetbohde"
|> String.length()
59
vs.
"zb2rhn92tqTt41uFZ3hh3VPnssXjYCW4yDSX7KB39dXZyMtNC"
|> String.length()
49
Create migration
Using the
mix ecto.gen.migration
command,
create a migration file:
mix ecto.gen.migration add_cid
You should see output similar to the following:
* creating priv/repo/migrations/20230824153220_add_cid.exs
This tells us that the migration file was created:
priv/repo/migrations/20230824153220_add_cid_to_item.exs
Open the file, you should see a blank migration:
defmodule App.Repo.Migrations.AddCidToItem do
  use Ecto.Migration

  def change do

  end
end
Update it to:
defmodule App.Repo.Migrations.AddCidToItem do
  use Ecto.Migration

  def change do
    alter table(:items) do
      add(:cid, :string)
    end
  end
end
Note: if you're rusty on
migrations, see: devhints.io/phoenix-migrations
Add cid field to item schema
Open the
lib/app/item.ex
file and locate the schema items do section.
Add the line:
field :cid, :string
Create put_cid/1 test
Create a new file with the path:
test/app/cid_test.exs
and add the following test:
defmodule App.CidTest do
  use App.DataCase, async: true

  @valid_attrs %{text: "Buy Bananas", person_id: 1, status: 2}

  test "put_cid/1 adds a `cid` for the `item` record" do
    # Create a changeset with a valid item record as the "changes":
    changeset_before = %{changes: @valid_attrs}
    # Should not yet have a cid:
    refute Map.has_key?(changeset_before.changes, :cid)

    # Confirm cid was added to the changes:
    changeset_with_cid = App.Cid.put_cid(changeset_before)
    assert changeset_with_cid.changes.cid == Cid.cid(@valid_attrs)

    # confirm idempotent:
    assert App.Cid.put_cid(changeset_with_cid) == changeset_with_cid
  end
end
Running this test will fail:
mix test test/app/cid_test.exs
E.g:
** (UndefinedFunctionError) function App.Cid.put_cid/1 is undefined or private.
Let's implement it!
Create put_cid/1 function
Create a new file with the path:
lib/app/cid.ex.
Add the following function definition to the file:
defmodule App.Cid do
  def put_cid(changeset) do
    if Map.has_key?(changeset.changes, :cid) do
      changeset
    else
      cid = Cid.cid(changeset.changes)
      %{changeset | changes: Map.put(changeset.changes, :cid, cid)}
    end
  end
end
The function just adds a cid to the changeset.changes
so that it creates a hash of the contents of the changeset
and then adds the cid to identify that content.
If the changes already have a cid don't do anything.
This covers the case where an item is created in the Mobile client
with a cid. We will add verification for this later.
Invoke put_cid/1 in Item.changeset/2
In the
lib/app/item.ex
file, locate the changeset/2 function definition
and change the lines:
|> cast(attrs, [:person_id, :status, :text])
|> validate_required([:text, :person_id])
To:
|> cast(attrs, [:cid, :person_id, :status, :text])
|> validate_required([:text, :person_id])
|> App.Cid.put_cid()
The call to put_cid/1 within changeset/2
adds the cid to the item record.
Checkpoint: item table with cid
After running the migration:
mix ecto.migrate
The item table has the cid column:
Even though the cid field was added to the table,
it is empty for all existing item records.
Easily resolved.
Update all item records
Add the following function to
lib/app/item.ex:
  def update_all_items_cid do
    items = list_items()
    Enum.each(items, fn i ->
      item = %{
        person_id: i.person_id,
        status: i.status,
        text: i.text,
        id: i.id,
      }
      i
      |> changeset(Map.put(item, :cid, Cid.cid(item)))
      |> Repo.update()
    end)
  end
end
Invoke it in the
priv/repo/seeds.exs
so that all items
are given a cid.
With that working we can get back to using this
in our next feature; lists!
Lists
Our MVP App already has
much of the basic functionality we need/want
but is sorely lacking
a way to organize items
into distinct projects/areas.
Let's fix that by introducing lists!
Quick Recap
Up till this point we've deliberately kept the MVP
as lean as possible to avoid complexity.
The
Entity Relationship Diagram
(ERD) is currently:
Just the four tables you've already seen in the previous sections.
Our reasons for adding lists now are:
a) Separate lists
for different areas of life/work
have been on our
product roadmap for a while ...
specifically:
dwyl/app#271
b) We want to use lists
as the basis for organizing
and
re-ordering items.
c) lists will unlock other functionality we have planned
that will make the App more useful both to individuals and teams.
Create lists Schema
Create the lists table
with the following
mix phx.gen.schema
command:
mix phx.gen.schema List list cid:string name:string person_id:integer seq:string sort:integer status:integer
This command will create the following migration:
20230416001029_create_lists.exs
defmodule App.Repo.Migrations.CreateLists do
  use Ecto.Migration

  def change do
    create table(:lists) do
      add :cid, :string
      add :name, :string
      add :person_id, :integer
      add :seq, :string
      add :sort, :integer
      add :status, :integer

      timestamps()
    end
  end
end
Once we run mix ecto.migrate,
we have the following database
ERD:
This new database table
lets us create a list
but there is still more work to be done
to enable the features we want.
Quick Look at /lib/app/list.ex file
The mix phx.gen.schema command created the
lib/app/list.ex
file with the following:
defmodule App.List do
  use Ecto.Schema
  import Ecto.Changeset

  schema "lists" do
    field :cid, :string
    field :name, :string
    field :person_id, :integer
    field :seq, :string
    filed :sort, :integer
    field :status, :integer

    timestamps()
  end

  @doc false
  def changeset(list, attrs) do
    list
    |> cast(attrs, [:cid, :name, :person_id, :seq, :sort, :status])
    |> validate_required([:name, :person_id])
    |> App.Cid.put_cid()
  end
end
The schema matches the migration above.
Just the 5 fields we need for creating lists:
cid- the universally uniqueidfor thelist.name- the name of the list. a:stringof arbitrary length.person_id- theidof thepersonwho created thelistseq- the sequence ofitem.cidfor thelistsort- the sort order for theliste.g. 1:Ascendingstatus- thestatus(represented as anInteger) for thelist. see: dwyl/statuses
The only function in the list.ex file is changeset/2
which just checks the fields in teh attrs Map
and validates the data that are required to create a list.
Create list_test.exs Tests File (TDD)
The gen.schema command only creates the migration file
and the corresponding schema file in the
lib/app
directory of our Phoenix App.
It does not create any CRUD functions or tests.
This is fine because most of what we need is bespoke.
Manually create the test file
with the following path:
test/app/list_test.exs.
In the test file
test/app/list_test.exs
add the following test code:
defmodule App.ListTest do
  use App.DataCase, async: true
  alias App.{List}

  describe "list" do
    @valid_attrs %{name: "My List", person_id: 1, status: 2}
    @update_attrs %{name: "some updated text", person_id: 1}
    @invalid_attrs %{name: nil}

    test "get_list!/2 returns the list with given id" do
      {:ok, %{model: list, version: _version}} = List.create_list(@valid_attrs)
      assert List.get_list!(list.id).name == list.name
    end

    test "create_list/1 with valid data creates a list" do
      assert {:ok, %{model: list, version: _version}} =
               List.create_list(@valid_attrs)

      assert list.name == @valid_attrs.name
    end

    test "create_list/1 with invalid data returns error changeset" do
      assert {:error, %Ecto.Changeset{}} = List.create_list(@invalid_attrs)
    end

    test "update_list/2 with valid data updates the list" do
      {:ok, %{model: list, version: _version}} = List.create_list(@valid_attrs)

      assert {:ok, %{model: list, version: _version}} =
               List.update_list(list, @update_attrs)

      assert list.name == "some updated text"
    end
  end
end
Once you've saved the file, run the tests with the following command:
mix test test/app/list_test.exs
You should see all four tests fail (because the functions they invoke do not yet exist):
1) test list create_list/1 with valid data creates a list (App.ListTest)
     test/app/list_test.exs:15
     ** (UndefinedFunctionError) function App.List.create_list/1 is undefined or private
     code: List.create_list(@valid_attrs)
     stacktrace:
       (app 1.0.0) App.List.create_list(%{status: 2, text: "My List", person_id: 1})
       test/app/list_test.exs:17: (test)

  2) test list create_list/1 with invalid data returns error changeset (App.ListTest)
     test/app/list_test.exs:24
     ** (UndefinedFunctionError) function App.List.create_list/1 is undefined or private
     code: assert {:error, %Ecto.Changeset{}} = List.create_list(@invalid_attrs)
     stacktrace:
       (app 1.0.0) App.List.create_list(%{text: nil})
       test/app/list_test.exs:25: (test)

  3) test list get_list!/2 returns the list with given id (App.ListTest)
     test/app/list_test.exs:10
     ** (UndefinedFunctionError) function App.List.create_list/1 is undefined or private
     code: {:ok, %{model: list, version: _version}} = List.create_list(@valid_attrs)
     stacktrace:
       (app 1.0.0) App.List.create_list(%{status: 2, text: "My List", person_id: 1})
       test/app/list_test.exs:11: (test)

  4) test list update_list/2 with valid data updates the list (App.ListTest)
     test/app/list_test.exs:28
     ** (UndefinedFunctionError) function App.List.create_list/1 is undefined or private
     code: {:ok, %{model: list, version: _version}} = List.create_list(@valid_attrs)
     stacktrace:
       (app 1.0.0) App.List.create_list(%{status: 2, text: "My List", person_id: 1})
       test/app/list_test.exs:29: (test)


Finished in 0.03 seconds (0.03s async, 0.00s sync)
4 tests, 4 failures

Randomized with seed 730787
This is expected. Let's create the required functions.
Define the basic lists functions
In the
lib/app/list.ex
file,
add the following aliases near the top of the file:
alias App.{Repo}
alias PaperTrail
alias __MODULE__
Next add the following functions:
def create_list(attrs) do
  %List{}
  |> changeset(attrs)
  |> PaperTrail.insert()
end

def get_list!(id) do
  List
  |> Repo.get!(id)
end

def update_list(%List{} = list, attrs) do
  list
  |> List.changeset(attrs)
  |> PaperTrail.update()
end
The main functions to pay attention to
in the newly created files are:
App.List.create_list/1
that creates a new list
and
App.List.update_list/2
which updates the list.
Both are simple and well-documented.
create_list/1
create_list/1 receives a Map of attrs (attributes)
which it validates using changeset/2 function
and then inserts into the lists table
via the PaperTrail.insert() function:
def create_list(attrs) do
  %List{}
  |> changeset(attrs)
  |> PaperTrail.insert()
end
The attrs are just:
namethe name/description of the listperson_idtheidof thepersoncreating the list, andstatus(optional) anintegerrepresenting thestatusof thelist, this is useful later when people have adraftorarchivedlist.
If you are new to the PaperTrail package
and the benefits it offers,
we wrote a quick intro:
dwyl/phoenix-papertrail-demo
The gist is this: it gives us version history for records in our database without any query overhead.
Get lists for a person
To display the lists
that belong to a person
we need a simple query.
Test get_lists_for_person/1
Open the
test/app/list_test.exs
file
and add the following test:
test "get_lists_for_person/1 returns the lists for the person_id" do
  person_id = 3
  lists_before = App.List.get_lists_for_person(person_id)
  assert length(lists_before) == 0

  # Create a couple of lists
  {:ok, %{model: all_list}} =
    %{name: "all", person_id: person_id, status: 2}
    |> App.List.create_list()

  {:ok, %{model: recipe_list}} =
    %{name: "recipes", person_id: person_id, status: 2}
    |> App.List.create_list()

  # Retrieve the lists for the person_id:
  lists_after = App.List.get_lists_for_person(person_id)
  assert length(lists_after) == 2
  assert Enum.member?(lists_after, all_list)
  assert Enum.member?(lists_after, recipe_list)
end
Implment the get_lists_for_person/1 function
In the lib/app/list.ex file,
implement the function
as simply as possible:
def get_lists_for_person(person_id) do
  List
  |> where(person_id: ^person_id)
  |> Repo.all()
end
For this function to work, replace the line:
import Ecto.Changeset
With:
import Ecto.{Changeset, Query}
i.e. we need to import the
Ecto.Query
module
to gain access to the the
where/3
filtering function.
Note: If you're rusty on
Ecto.Query, refresh your memory on: elixirschool.com/ecto/querying_basics And if you get stuck, please just open an issue.
Make sure the test is passing as we will be using this function next!
Create the "All" list for a given person_id
In order to have sorting/reordering of list_items
(see next chapter)
we first need to have a list!
Rather than forcing people
to manually create their "all" list
before they know what a list is,
it will be created for them automatically
when they first authenticate.
Test get_list_by_text!/2
In the
test/app/list_test.exs
file,
create the following test:
test "get_list_by_text!/2 returns the list for the person_id by text" do
  person_id = 4
  %{name: "All", person_id: person_id, status: 2}
    |> App.List.create_list()
  list = App.List.get_list_by_text!("all", person_id)
  assert list.text == "all"
end
Define get_list_by_text!/2
This is one is dead simple thanks to Ecto compact syntax:
def get_list_by_text!(name, person_id) do
  Repo.get_by(List, name: name, person_id: person_id)
end
Note: in future, we may need to use
Repo.one/2if we think there's a chance apersonmay have multiplelistswith"all" in thelist.name.
Add Existing itmes to the "All" list
One final function we need
in order to retroactively add lists
to our MVP App that started out without lists
is a function to add all the existing items
to the newly created "All" list.
Test add_all_items_to_all_list_for_person_id/1
Note: This is a temporary function that we will
deleteonce all the existing people using theMVPhave transitioned theiritemsto the "All"list. But we still need to have a test for it!
Open
test/app/list_test.exs
and add the following test:
test "add_all_items_to_all_list_for_person_id/1 to seed the All list" do
  person_id = 0
  all_list = App.List.get_list_by_text!(person_id, "All")
  count_before = App.ListItem.next_position_on_list(all_list.id)
  assert count_before == 1

  item_ids = App.ListItem.get_items_on_all_list(person_id)
  assert length(item_ids) == 0

  App.ListItem.add_items_to_all_list(person_id)
  updated_item_ids = App.ListItem.get_items_on_all_list(person_id)
  assert length(updated_item_ids) ==
            length(App.Item.all_items_for_person(person_id))

  count_after = App.ListItem.next_position_on_list(all_list.id)
  assert count_before + length(updated_item_ids) == count_after
end
That's a very long test. Take a moment to read it through. Remember: this will be deleted, it's just data migration code.
Define add_items_to_all_list/1
In the
lib/app/list_item.ex
file,
add the add_items_to_all_list/1 function definition:
def add_items_to_all_list(person_id) do
  all_list = App.List.get_list_by_text!(person_id, "All")
  all_items = App.Item.all_items_for_person(person_id)
  item_ids_in_all_list = get_items_on_all_list(person_id)

  all_items
  |> Enum.with_index()
  |> Enum.each(fn {item, index} ->
    unless Enum.member?(item_ids_in_all_list, item.id) do
      add_list_item(item, all_list, person_id, (index + 1) / 1)
    end
  end)
end
Update list.seq
In order to update the sequence of item cids for a given list
we need to define a simple function.
Test update_list_seq/3
Open the test/app/list_test.exs file and add the following test:
  test "update_list_seq/3 updates the list.seq for the given list" do
    person_id = 314
    all_list = App.List.get_all_list_for_person(person_id)

    # Create a couple of items:
    assert {:ok, %{model: item1}} =
        Item.create_item(%{text: "buy land!", person_id: person_id, status: 2})
    assert {:ok, %{model: item2}} =
      Item.create_item(%{text: "plant trees & food", person_id: person_id, status: 2})
    assert {:ok, %{model: item3}} =
        Item.create_item(%{text: "live best life", person_id: person_id, status: 2})

    # Add the item cids to the list.seq:
    seq = "#{item1.cid},#{item2.cid},#{item3.cid}"

    # Update the list.seq for the all_list:
    {:ok, %{model: list}} = App.List.update_list_seq(all_list.cid, person_id, seq)
    assert list.seq == seq

    # Reorder the cids and update the list.seq
    updated_seq = "#{item3.cid},#{item2.cid},#{item1.cid}"
    {:ok, %{model: list}} = App.List.update_list_seq(all_list.cid, person_id, updated_seq)
    assert list.seq == updated_seq
  end
Most of this test is setup code to create the items.
The important bit is defining the seq and then invoking the update_list_seq/3 function.
Implement update_list_seq/3 function
  def update_list_seq(list_cid, person_id, seq) do
    list = get_list_by_cid!(list_cid)
    update_list(list, %{seq: seq, person_id: person_id})
  end
With that function in place we have everything we need for updating a list.
Let's add some interface code to allow people to reorder the items in their list!
Reordering items in a list
The people who
tested
the MVP
noted that the ability to organise their items
as an essential feature:
dwyl/mvp#145
With the addition of lists
we now have a way of organising our items
using the list.seq or sequence.
This chapter will take you through how we implented reordering
in the MVP from first principals.
Note: There is quite a lot to cover in this chapter, so we have created two standalone tutorials: drag-and-drop and cursor-tracking which detail the mechanics of dragging and dropping
itemsand cursor tracking across browsers/devices. If you are totally new to drag-and-drop, we suggest following at least that one for full context.
At the end of this chapter you will be able to reorder the items in a list
with cursor tracking and item highlighting:
Get/Set list.cid in mount/3
In order for us to know which list
the person is viewing - and thus reordering -
we need to add it to the socket.assigns in the mount/3 function.
Open the lib/app_web/live/app_live.ex file
and locate the mount/3 function.
Add the following lines to the body:
# Create or Get the "all" list for the person_id
all_list = App.List.get_all_list_for_person(person_id)
# Temporary function to add All *existing* items to the "All" list:
App.List.add_all_items_to_all_list_for_person_id(person_id)
This is invoking two functions we previously created in lists.
Then in the returned tuple:
{:ok,
     assign(socket,
       items: items,
       etc.
Make sure to add the line:
list_cid: all_list.cid,
That will ensure that we know the list.cid
later when the person reorders their items.
Moving items in the interface
There is quite a lot of code required
to move items in the interface,
we need to update 4 files.
Update the <li>
In the lib/app_web/live/app_live.html.heex file,
locate the <ul> (unordered list) defintion:
  <!-- List of items with inline buttons and controls -->
  <ul class="w-full">
    <%= for item <- filter_items(@items, @filter, @filter_tag) do %>
      <li
        data-id={item.id}
        class="mt-2 flex w-full border-t border-slate-200 py-2"
      >
Replace it with the following:
  <!-- List of items with inline buttons and controls -->
  <ul id="items" phx-hook="Items" x-data="{selectedItem: null}" class="w-full">
    <%= for item <- filter_items(@items, @filter, @filter_tag) do %>
      <li
        id={"item-#{item.id}"}
        data-id={item.id}
        class={"mt-2 flex flex-col w-full border-t border-slate-200 py-2 item
            #{if item.id == @editing do 'cursor-default' else 'cursor-grab' end}"}
        draggable={"#{if item.id == @editing do 'false' else 'true' end}"}
        x-data="{selected: false}"
        x-on:dragstart="selected = true; $dispatch('highlight', {id: $el.id}); selectedItem = $el"
        x-on:dragend="selected = false; $dispatch('remove-highlight', {id: $el.id}); selectedItem = null; $dispatch('update-indexes', {fromItemId: $el.dataset.id})"
        x-bind:class="selected ?? 'cursor-grabbing'"
        x-on:dragover.throttle="$dispatch('dragoverItem', {selectedItemId: selectedItem.id, currentItem: $el})"
        data-highlight={JS.add_class("bg-teal-300")}
        data-remove-highlight={JS.remove_class("bg-teal-300")}
      >
There's a lot going on in this definition. But it's all related to 5 key areas:
- Select an
itemto be moved/reordered - Add a highlight when an
itemis selected - _Display) the appropriate
cursor-grabbingclass when theitemis selected. - Dispatch the
dragoverItemevent so that other connected clients can see theitembeing moved - Remove the
highlightwhen theitemis no longer selected.
Note: if you feel this section could benefit from further explanation, please first read: drag-and-drop and cursor-tracking And if anything is still unclear, please open an issue: dwyl/book/issues
Add JS event handling code:
In the assets/js/app.js file,
add the following code:
// Drag and drop highlight handlers
window.addEventListener("phx:highlight", (e) => {
  document.querySelectorAll("[data-highlight]").forEach(el => {
    if(el.id == e.detail.id) {
        liveSocket.execJS(el, el.getAttribute("data-highlight"))
    }
  })
})

// Item id of the destination in the DOM
let itemId_to;

let Hooks = {}
Hooks.Items = {
  mounted() {
    const hook = this

    this.el.addEventListener("highlight", e => {
      hook.pushEventTo("#items", "highlight", {id: e.detail.id})
      // console.log('highlight', e.detail.id)
    })

    this.el.addEventListener("remove-highlight", e => {
      hook.pushEventTo("#items", "removeHighlight", {id: e.detail.id})
      // console.log('remove-highlight', e.detail.id)
    })

    this.el.addEventListener("dragoverItem", e => {
      // console.log("dragoverItem", e.detail)
      const currentItemId = e.detail.currentItem.id
      const selectedItemId = e.detail.selectedItemId
      if( currentItemId != selectedItemId) {
        hook.pushEventTo("#items", "dragoverItem", {currentItemId: currentItemId, selectedItemId: selectedItemId})
        itemId_to = e.detail.currentItem.dataset.id
      }
    })

    this.el.addEventListener("update-indexes", e => {
      const item_id = e.detail.fromItemId
      const list_ids = get_list_item_cids()
      console.log("update-indexes", e.detail, "list: ", list_ids)
      // Check if both "from" and "to" are defined
      if(item_id && itemId_to && item_id != itemId_to) {
        hook.pushEventTo("#items", "update_list_seq",
          {seq: list_ids})
      }

      itemId_to = null;
    })
  }
}

/**
 * `get_list_item_ids/0` retrieves the full `list` of visible `items` form the DOM
 * and returns a String containing the IDs as a space-separated list e.g: "1 2 3 42 71 93"
 * This is used to determine the `position` of the `item` that has been moved.
 */
function get_list_item_cids() {
  console.log("invoke get_list_item_ids")
  const lis = document.querySelectorAll("label[phx-value-cid]");
  return Object.values(lis).map(li => {
    return li.attributes["phx-value-cid"].nodeValue
  }).join(",")
}

window.addEventListener("phx:remove-highlight", (e) => {
  document.querySelectorAll("[data-highlight]").forEach(el => {
    if(el.id == e.detail.id) {
        liveSocket.execJS(el, el.getAttribute("data-remove-highlight"))
    }
  })
})

window.addEventListener("phx:dragover-item", (e) => {
  console.log("phx:dragover-item", e.detail)
  const selectedItem = document.querySelector(`#${e.detail.selected_item_id}`)
  const currentItem = document.querySelector(`#${e.detail.current_item_id}`)

  const items = document.querySelector('#items')
  const listItems = [...document.querySelectorAll('.item')]

  if(listItems.indexOf(selectedItem) < listItems.indexOf(currentItem)){
    items.insertBefore(selectedItem, currentItem.nextSibling)
  }

  if(listItems.indexOf(selectedItem) > listItems.indexOf(currentItem)){
    items.insertBefore(selectedItem, currentItem)
  }
})
Again, there's a fair amount of code there so take a moment to step through it and understand what each event listener does.
Handle event in LiveView
Back in the LiveView file,
lib/app_web/live/app_live.ex
add the following event handlers:
 @impl true
  def handle_event("highlight", %{"id" => id}, socket) do
    # IO.puts("highlight: #{id}")
    AppWeb.Endpoint.broadcast(@topic, "move_items", {:drag_item, id})
    {:noreply, socket}
  end

  @impl true
  def handle_event("removeHighlight", %{"id" => id}, socket) do
    # IO.puts("removeHighlight: #{id}")
    AppWeb.Endpoint.broadcast(@topic, "move_items", {:drop_item, id})
    {:noreply, socket}
  end

  @impl true
  def handle_event(
        "dragoverItem",
        %{
          "currentItemId" => current_item_id,
          "selectedItemId" => selected_item_id
        },
        socket
      ) do
    # IO.puts("285: current_item_id: #{current_item_id}, selected_item_id: #{selected_item_id} | #{Useful.typeof(selected_item_id)}")
    AppWeb.Endpoint.broadcast(
      @topic,
      "move_items",
      {:dragover_item, {current_item_id, selected_item_id}}
    )

    {:noreply, socket}
  end

  @impl true
  def handle_info(
        %Broadcast{
          event: "move_items",
          payload: {:dragover_item, {current_item_id, selected_item_id}}
        },
        socket
      ) do
    # IO.puts(
    #   "cur_item_id: #{current_item_id}, selected_item_id: #{selected_item_id}"
    # )

    {:noreply,
     push_event(socket, "dragover-item", %{
       current_item_id: current_item_id,
       selected_item_id: selected_item_id
     })}
  end

  @impl true
  def handle_info(
        %Broadcast{event: "move_items", payload: {:drag_item, item_id}},
        socket
      ) do
    {:noreply, push_event(socket, "highlight", %{id: item_id})}
  end

  @impl true
  def handle_info(
        %Broadcast{event: "move_items", payload: {:drop_item, item_id}},
        socket
      ) do
    {:noreply, push_event(socket, "remove-highlight", %{id: item_id})}
  end


  @impl true
  def handle_event(
        "update_list_seq",
        %{"seq" => seq},
        socket
      ) do
    list_cid = get_list_cid(socket.assigns)
    person_id = get_person_id(socket.assigns)
    App.List.update_list_seq(list_cid, person_id, seq)
    {:noreply, socket}
  end
Handle the update_list_seq event
All the highlight, remove-highlight and move_items
handlers are for presentation and synching between clients.
The handler that performs the actual list updating is:
  @impl true
  def handle_event(
        "update_list_seq",
        %{"seq" => seq},
        socket
      ) do
    list_cid = get_list_cid(socket.assigns)
    person_id = get_person_id(socket.assigns)
    App.List.update_list_seq(list_cid, person_id, seq)
    {:noreply, socket}
  end
This receives the seq (sequence of item.cid)
from the client and and updates the list.seq
using the previously defined update_list_seq/3 function.
With this code in place we now have everything we need for reordering items on a single list.
Try it!
Add a Test!
To ensure this feature is tested,
open the
test/app_web/live/app_live_test.exs
file and add the following test:
  test "Drag and Drop item", %{conn: conn} do
    person_id = 0
    # Creating Three items
    {:ok, %{model: item}} =
      Item.create_item(%{text: "Learn Elixir", person_id: person_id, status: 2})

    {:ok, %{model: item2}} =
      Item.create_item(%{ text: "Build Awesome App", person_id: person_id, status: 2})

    {:ok, %{model: item3}} =
      Item.create_item(%{ text: "Profit", person_id: person_id, status: 2})

    # Create "all" list for this person_id:
    list = App.List.get_all_list_for_person(person_id)

    # Add all items to "all" list:
    App.List.add_all_items_to_all_list_for_person_id(person_id)

    # Render LiveView
    {:ok, view, _html} = live(conn, "/")

    # Highlight broadcast should have occurred
    assert render_hook(view, "highlight", %{"id" => item.id})
      |> String.split("bg-teal-300")
      |> Enum.drop(1)
      |> length() > 0

    # Dragover and remove highlight
    render_hook(view, "dragoverItem", %{
      "currentItemId" => item2.id,
      "selectedItemId" => item.id
    })

    assert render_hook(view, "removeHighlight", %{"id" => item.id})

    # reorder items:
    render_hook(view, "updateIndexes", %{
      "seq" => "#{item.cid},#{item2.cid},#{item3.cid}"
    })

    all_list = App.List.get_all_list_for_person(person_id)
    seq = App.List.get_list_seq(all_list)
    pos1 = Enum.find_index(seq, fn x -> x == "#{item.cid}" end)
    pos2 = Enum.find_index(seq, fn x -> x == "#{item2.cid}" end)
    # IO.puts("#{pos1}: #{item.cid}")
    # IO.puts("#{pos2}: #{item2.cid}")

    assert pos1 < pos2

    # Update list_item.seq:
    {:ok, %{model: list}} = App.List.update_list_seq(list.cid, person_id,
        "#{item.cid},#{item3.cid},#{item2.cid}")
    new_seq = list.seq |> String.split(",")
    # dbg(new_seq)
    pos2 = Enum.find_index(new_seq, fn x -> x == "#{item2.cid}" end)
    pos3 = Enum.find_index(new_seq, fn x -> x == "#{item3.cid}" end)
    assert pos3 < pos2
  end
Again, there's a lot going on in this test
because it's testing for
both the highlight
and the update of the seq (sequence of item.cid) in the list.
Take a momemnt to step through it and if you have any questions, ask!
A good place to read all the code for this in one place is: https://github.com/dwyl/mvp/pull/345/files
Make Lists Useful
To make our lists feature useful
we need to be able to:
- Create new custom
lists. - Add an
itemto thelist. - Remove an
itemfrom alist.
Create new list
TODO: Document the functions and interface implemented in: https://github.com/dwyl/mvp/pull/165
Add item to list
Remove item from list
Most of the time people don't want
an item to be on multiple lists.
So we need a function to remove an item from a list
when it gets moved to a different list.
Thankfully it's pretty straightforward.
Test remove_item_from_list/3
Open the test/app/list_test.exs file
and add the following test:
  test "remove_item_from_list/3 removes the item.cid from the list.seq" do
    # Random Person ID
    person_id = 386
    all_list = App.List.get_all_list_for_person(person_id)

    # Create items:
    assert {:ok, %{model: item1}} =
      Item.create_item(%{text: "buy land!", person_id: person_id, status: 2})
    assert {:ok, %{model: item2}} =
      Item.create_item(%{text: "prepare for societal collapse", person_id: person_id, status: 2})

    # Add both items to the list:
    seq = "#{item1.cid},#{item2.cid}"
    {:ok, %{model: list}} = App.List.update_list_seq(all_list.cid, person_id, seq)
    assert list.seq == seq

    # Remove the first item from the list:
    {:ok, %{model: list}} = App.List.remove_item_from_list(item1.cid, all_list.cid, person_id)

    # Only item2 should be on the list.seq:
    updated_seq = "#{item2.cid}"
    # Confirm removed:
    assert list.seq == updated_seq
  end
Running this test (before implementing the function) will result in the following error:
mix test test/app/list_test.exs
E.g:
warning: App.List.remove_item_from_list/2 is undefined or private
  test/app/list_test.exs:141: App.ListTest."test remove_item_from_list/3 removes the item.cid from the list.seq"/1


  1) test remove_item_from_list/3 removes the item.cid from the list.seq (App.ListTest)
     test/app/list_test.exs:124
     ** (UndefinedFunctionError) function App.List.remove_item_from_list/2 is undefined or private
     code: {:ok, %{model: list}} = App.List.remove_item_from_list(item1.cid, all_list.cid)
     stacktrace:
       (app 1.0.0) App.List.remove_item_from_list("zb2rhdaNQbkwwfEB9z65yRAtzmZvZmC5A3ei6tSkzySXaiKfi", "zb2rhid7hk43h1P24u7x88dAesrCVmh4uR53mUscxDAemyDaQ")
       test/app/list_test.exs:141: (test)


Finished in 0.1 seconds (0.1s async, 0.00s sync)
11 tests, 1 failure
Thankfully this is easy to resolve.
Implement remove_item_from_list/3 function
Open the
lib/app/list.ex
file
and add the following function defition:
def remove_item_from_list(item_cid, list_cid, person_id) do
list = get_list_by_cid!(list_cid)
# get existing list.seq
seq =
    get_list_seq(list)
    # remove the item_cid from the list.seq:
    |> Useful.remove_item_from_list(item_cid)
    |> Enum.join(",")

update_list(list, %{seq: seq, person_id: person_id})
end
This uses the super simple function:
Useful.remove_item_from_list/2
which we published
in our library of
Useful
functions. ⭐
Metrics
This chapter adds a few basic metrics for the people using the MVP. 📈
If you have ideas for additional stats you want to see,
please open an issue:
dwyl/mvp/issues 🙏
Adding Sorting to the track metrics table and more additional fields
What happens when we need to track more metrics?
And even, when we get more users on the MVP?
How can we sort the columns to make it easier to understand the data?
One of the most intuitive ways to manage large datasets is by enabling sorting. It allows users to arrange data in a manner that's most meaningful to them, be it in ascending or descending order. This makes it significantly easier to spot trends, anomalies, or specific data points.
In this section, we will supercharge our track metrics table, we will:
- Introduce new columns (First Joined, Last Item Inserted and Total Elapsed Time)
- Highlight your user on the table
- Create a Table
LiveComponentto componentize our table that can be used throughout the application - Implement Column Sorting
Sneak Peek ;D
Add new columns
With the growth of our MVP, we've identified the need for more detailed metrics. This involves adding more fields to our existing stats query.
Since our new fields have dates to be shown we need a way to format them.
Let's create a new file called date_time_helper.ex inside the lib/app folder.
defmodule App.DateTimeHelper do
  require Decimal
  alias Timex.{Duration}

  def format_date(date) do
    Calendar.strftime(date, "%m/%d/%Y %H:%M:%S")
  end

  def format_duration(nil), do: ""

  def format_duration(seconds) when Decimal.is_decimal(seconds) do
    duration = seconds |> Decimal.to_integer() |> Duration.from_seconds()

    Timex.format_duration(duration, :humanized)
  end

  def format_duration(_seconds), do: ""
end
This is a new helper module that we are going to use to format dates and durations.
We will need the Decimal and the Timex library to format it.
require Decimal
This line tells Elixir that you will be using macros from the Decimal module. This is needed because the code calls Decimal.is_decimal/1 later.
alias Timex.{Duration}
An alias is a way to reference a module with a shorter name. Here, we're creating an alias for Timex.Duration so that we can simply write Duration instead of the full module name.
def format_date(date) do
  Calendar.strftime(date, "%m/%d/%Y %H:%M:%S")
end
This function takes in a date and returns a formatted string in the pattern "MM/DD/YYYY HH:MM:SS". It uses the strftime function from the Calendar module to accomplish this.
def format_duration(nil), do: ""

def format_duration(seconds) when Decimal.is_decimal(seconds) do
  duration = seconds |> Decimal.to_integer() |> Duration.from_seconds()

  Timex.format_duration(duration, :humanized)
end

def format_duration(_seconds), do: ""
The first function clause matches when the input is nil. It simply returns an empty string.
The second clause is where the juicy is, it matches when the given seconds is a decimal (in this case, it's what is going to be return from Ecto). It does the following:
- Checks if seconds is a decimal using Decimal.is_decimal/1.
- Converts the decimal value of seconds to an integer using Decimal.to_integer/1.
- Converts the integer value to a duration using Duration.from_seconds/1.
- Formats the duration using Timex.format_duration/2 with a :humanized option.
The last clause of the format_duration/1 function matches any input (other than nil and decimals, which were handled by the previous clauses). This function simply returns an empty string.
In summary, this App.DateTimeHelper module provides utility functions to format dates and durations. Dates are formatted in the "MM/DD/YYYY HH:MM:SS" pattern, while durations are formatted in a humanized form if they are decimals; otherwise, an empty string is returned. If we want we could possibly extend this module to more utilities functions.
Now, we can create some tests for this new module, inside the test/app create a new file called date_time_helper_test.exs with the following content.
defmodule App.DateTimeHelperTest do
  use ExUnit.Case
  alias App.DateTimeHelper
  alias Timex

  describe "format_date/1" do
    test "formats a date correctly" do
      dt = Timex.parse!("2023-08-02T15:30:30+00:00", "{ISO:Extended}")
      assert DateTimeHelper.format_date(dt) == "08/02/2023 15:30:30"
    end
  end

  describe "format_duration/1" do
    test "returns an empty string for nil" do
      assert DateTimeHelper.format_duration(nil) == ""
    end

    test "returns an empty string when other than decimal" do
      assert DateTimeHelper.format_duration(12345) == ""
    end

    test "formats a duration correctly" do
      duration_seconds = Decimal.new(12345)

      assert DateTimeHelper.format_duration(duration_seconds) ==
               "3 hours, 25 minutes, 45 seconds"
    end

    test "formats a zero decimal duration correctly" do
      duration_seconds = Decimal.new(0)

      assert DateTimeHelper.format_duration(duration_seconds) ==
               "0 microseconds"
    end
  end
end
This file tests various cases using the DateTimeHelper, feel free to take your time to understand each one.
With our Helper fully tested we can now modify our item.ex to return the new columns that we want in our Stats Live page.
Open item.ex and update the person_with_item_and_timer_count/0 method:
def person_with_item_and_timer_count() do
  sql = """
  SELECT i.person_id,
  COUNT(distinct i.id) AS "num_items",
  COUNT(distinct t.id) AS "num_timers",
  MIN(i.inserted_at) AS "first_inserted_at",
  MAX(i.inserted_at) AS "last_inserted_at",
  SUM(EXTRACT(EPOCH FROM (t.stop - t.start))) AS "total_timers_in_seconds"
  FROM items i
  LEFT JOIN timers t ON t.item_id = i.id
  GROUP BY i.person_id
  """

  Ecto.Adapters.SQL.query!(Repo, sql)
  |> map_columns_to_values()
end
We are just adding three new columns to it, first_inserted_at, last_inserted_at and total_timers_in_seconds.
MIN(i.inserted_at) AS "first_inserted_at"
This column gets the earliest inserted_at timestamp from the items table for each person_id. The MIN SQL function retrieves the minimum value in the inserted_at column for each group of records with the same person_id.
MAX(i.inserted_at) AS "last_inserted_at"
Conversely, this column gets the most recent inserted_at timestamp from the items table for each person_id. The MAX SQL function retrieves the maximum value in the inserted_at column for each group of records with the same person_id.
SUM(EXTRACT(EPOCH FROM (t.stop - t.start))) AS "total_timers_in_seconds"
This one is more tricky, but don't worry. This column calculates the total duration of all timers associated with each item for a given person_id.
The inner expression (t.stop - t.start) calculates the duration of each timer by subtracting the start time from the stop time, this will give us a resulted timestamp that is the difference between the two.
The EXTRACT(EPOCH FROM ...) function then converts this duration into seconds. Finally, the SUM function aggregates (sums up) all these durations for each group of records with the same person_id.
You can read more about the EXTRACT PostgreSQL function here.
Done!
There is one last thing we need to do to show our new columns on the Phoenix template.
We need to add a helpers in our stats_live.ex file so we can format the date and duration.
Open this file and add the following code in the beggining of the file and the two methods on the end:
defmodule AppWeb.StatsLive do
  ...
  alias App.{Item, DateTimeHelper}
  ...

  def format_date(date) do
    DateTimeHelper.format_date(date)
  end

  def format_seconds(seconds) do
    DateTimeHelper.format_duration(seconds)
  end
end
This is just calling the DateTimeHelper module with the methods that we created.
Great! Now we can show or new columns inside the Phoenix Template.
Open the stats_live.html.heex and update the table to add the new columns and fields:
<table class="text-sm text-left text-gray-500 dark:text-gray-400 table-auto">
  <thead class="text-xs text-gray-700 uppercase bg-gray-50 dark:bg-gray-700 dark:text-gray-400">
    <tr>
      ...
      <th scope="col" class="px-6 py-3 text-center">
        First Joined
      </th>
      <th scope="col" class="px-6 py-3 text-center">
        Last Item Inserted
      </th>
      <th scope="col" class="px-6 py-3 text-center">
        Total Elapsed Time
      </th>
    </tr>
  </thead>
  <tbody>
    <%= for metric <- @metrics do %>
      <tr class="bg-white border-b dark:bg-gray-800 dark:border-gray-700">
        ...
        <td class="px-6 py-4 text-center">
          <%= format_date(metric.first_inserted_at) %>
        </td>
        <td class="px-6 py-4 text-center">
          <%= format_date(metric.last_inserted_at) %>
        </td>
        <td class="px-6 py-4 text-center">
          <%= format_seconds(metric.total_timers_in_seconds) %>
        </td>
      </tr>
    <% end %>
  </tbody>
</table>
Done! Now we have our new columns and rows with the appropriate information as planned and already formatted.
The next tasks will only enhance that!
Highlight your user on the table
To emphasize the currently logged-in user within the table, we'll first need to retrieve the user's information within our Phoenix LiveView, similar to how app_live operates.
Begin by opening stats_live.ex and add the following code:
defmodule AppWeb.StatsLive do
  ...
  @stats_topic "stats"

  defp get_person_id(assigns), do: assigns[:person][:id] || 0

  @impl true
  def mount(_params, _session, socket) do
    ...

    person_id = get_person_id(socket.assigns)
    metrics = Item.person_with_item_and_timer_count()

    {:ok,
     assign(socket,
       person_id: person_id,
       metrics: metrics,
     )}
  end

  ...
end
Now to explain the changes.
defp get_person_id(assigns), do: assigns[:person][:id] || 0
This function attempts to extract the :id of the :person from the given assigns (a map or struct). If it doesn't find an ID, it defaults to 0.
person_id = get_person_id(socket.assigns)
This line inside the mount/3 retrieves the person_id from the socket.assigns using the aforementioned private function.
Furthermore, the assign/3 function call has been updated to include this person_id in the socket's assigns.
In the previous step, we made adjustments to the AppWeb.StatsLive module to extract the person_id of the currently logged-in user. Now, it's time to use that to visually distinguish the user's row in our table.
Open the stats_live.html.heex file, where our table is defined. We're going to conditionally set the background and border colors of each table row based on whether the row corresponds to the currently logged-in user.
Locate the <tbody> section of your table, where each metric from @metrics is looped over to generate table rows and update the code to the following below:
...

</thead>
<tbody>
  <%= for metric <- @metrics do %>
    <tr class={
      if metric.person_id == @person_id,
        do:
          "bg-teal-100 border-teal-500 dark:bg-teal-800 dark:border-teal-700",
        else: "bg-white border-b dark:bg-gray-800 dark:border-gray-700"
    }>
      <td class="px-6 py-4">
        <a href={person_link(metric.person_id)}>
          <%= metric.person_id %>
...
What we're doing here is checking if the person_id of the current metric matches the @person_id (the ID of the logged-in user). If it does:
- The row will have a teal background (
bg-teal-100) and border (border-teal-500). - In dark mode, it will have a darker teal background (
dark:bg-teal-800) and border (dark:border-teal-700).
And if the IDs don't match, the row will maintain the same look.
With these changes, when you view your table now, the row corresponding to the currently logged-in user will be distinctly highlighted, providing an intuitive visual cue for users.
Creating a Table LiveComponent
In this section we are going to build a LiveComponent that can be reused throughout our application.
This LiveComponent will be a table with dynamic rows and columns so we can create other tables if needed. This will be a good showcase of the LiveComponent capabilities as well.
From the Phoenix.LiveComponent docs:
LiveComponents are a mechanism to compartmentalize state, markup, and events in LiveView.
So with that in mind, let's begin by creating our live component file.
Remember to create new folders if needed.
Create a new file inside the lib/app_web/live/components/table_component.ex with the following content:
defmodule AppWeb.TableComponent do
  use Phoenix.LiveComponent

  def render(assigns) do
    Phoenix.View.render(
      AppWeb.TableComponentView,
      "table_component.html",
      assigns
    )
  end
end
This is a simple LiveComponent code that points to a new table_component.html template, let's create this file too inside the lib/app_web/templates/table_component/table_component.html.heex with the following content:
<table class="text-sm text-left text-gray-500 dark:text-gray-400 table-auto">
  <thead class="text-xs text-gray-700 uppercase bg-gray-50 dark:bg-gray-700 dark:text-gray-400">
    <%= for column <- @column do %>
      <th
        scope="col"
        class="px-6 py-3 text-center cursor-pointer"
      >
        <a href="#" class="group inline-flex">
          <%= column.label %>
        </a>
      </th>
    <% end %>
  </thead>
  <tbody>
    <%= for row <- @rows do %>
      <tr class={
        if @highlight.(row),
          do:
            "bg-teal-100 border-teal-500 dark:bg-teal-800 dark:border-teal-700",
          else: "bg-white border-b dark:bg-gray-800 dark:border-gray-700"
      }>
        <%= for column <- @column do %>
          <%= render_slot(column, row) %>
        <% end %>
      </tr>
    <% end %>
  </tbody>
</table>
Before we proceed, let's take a moment to understand what we've just created:
The LiveComponent File:
- We've created a new
LiveComponentnamedAppWeb.TableComponent. - This component uses
Phoenix.View.render/3to render a template namedtable_component.html.
The Template File:
- This is a general-purpose table template with the all the current styles that we have on our
stats_livetemplate. - The headers () of the table are dynamically generated based on the
@columnassign, which is expected to be a list of columns with their respective labels.- The body () of the table is dynamically generated based on the
@rowsassign. Each row's appearance can be conditionally modified using the@highlightfunction (we are going to use to highlight the current logged user, remember?).- The
render_slot/2function suggests that this component will use "slots" - a feature in Phoenix LiveView that allows for rendering dynamic parts of a component.To finish the LiveComponent we just need to create our
viewfile that will make everything work together, create this new file insidelb/app_web/views/table_component_view.exwith the following content:defmodule AppWeb.TableComponentView do use AppWeb, :view endWith that in place, we can update our Stats page to use this LiveComponent in a dynamic way. Open the
stats_live.html.heexand make the following modifications:... Stats </h1> <.live_component module={AppWeb.TableComponent} id="table_component" rows={@metrics} highlight={&is_highlighted_person?(&1, @person_id)} > <:column :let={metric} label="Id" key="person_id"> <td class="px-6 py-4" data-test-id={"person_id_#{metric.person_id}"}> <a href={person_link(metric.person_id)}> <%= metric.person_id %> </a> </td> </:column> <:column :let={metric} label="Items" key="num_items"> <td class="px-6 py-4 text-center" data-test-id={"num_items_#{metric.person_id}"}> <%= metric.num_items %> </td> </:column> <:column :let={metric} label="Timers" key="num_timers"> <td class="px-6 py-4 text-center" data-test-id={"num_timers_#{metric.person_id}"}> <%= metric.num_timers %> </td> </:column> <:column :let={metric} label="First Joined" key="first_inserted_at"> <td class="px-6 py-4 text-center" data-test-id={"first_inserted_at_#{metric.person_id}"}> <%= format_date(metric.first_inserted_at) %> </td> </:column> <:column :let={metric} label="Last Item Inserted" key="last_inserted_at"> <td class="px-6 py-4 text-center" data-test-id={"last_inserted_at_#{metric.person_id}"}> <%= format_date(metric.last_inserted_at) %> </td> </:column> <:column :let={metric} label="Total Elapsed Time" key="total_timers_in_seconds" > <td class="px-6 py-4 text-center" data-test-id={"total_timers_in_seconds_#{metric.person_id}"}> <%= format_seconds(metric.total_timers_in_seconds) %> </td> </:column> </.live_component> </div> </main>Now let's breakdown the code.
<.live_component module={AppWeb.TableComponent} id="table_component" rows={@metrics} highlight={&is_highlighted_person?(&1, @person_id)} >- The tag
<.live_component>is the syntax to embed a LiveComponent within a LiveView. - We specify which LiveComponent to use using the
moduleattribute. In this case, it's theAppWeb.TableComponentwe discussed in the previous steps. - Setting the
idis essential for Phoenix to keep track of the component's state across updates. rows={@metrics}passes the@metricsassign to the component as its rows property.highlight={&is_highlighted_person?(&1, @person_id)}passes a function as the highlight property to the component. This function checks if a given row should be highlighted. We will create this function inside ourstats_live.exon the next step.
The next sections use the slot feature of LiveComponents:
<:column :let={metric} label="Id" key="person_id">
  ...
</:column>
<:column ...>is a slot. It tells theTableComponenthow to render each cell of a column. The:let={metric}attribute means that inside this slot, you can access each row's data with the variable metric.label="Id"specifies the header label for this column.key="person_id"this key will be used to sort the columns when we get there.
Inside each slot, the template for rendering the cell is provided. For instance:
<td class="px-6 py-4" data-test-id="person_id">
  <a href={person_link(metric.person_id)}>
    <%= metric.person_id %>
  </a>
</td>
This renders a table cell with the
person_idcontent. Thedata-test-idattribute will be used for testing purposes, making it easier to find this specific element in test scenarios, more about that later.As a last update for this section we need to create the
is_highlighted_person?/2method inside ourstats_live.exfile:defmodule AppWeb.StatsLive do ... def is_highlighted_person?(metric, person_id), do: metric.person_id == person_id endIn summary, this code replaces the static table that we had with a dynamic one, utilizing our
TableComponent.Now you can run the code and see the same result that we had before.
Implement Column Sorting
Finally, we are in our last section to add the column sorting feature!
For these we will need:
- Add the sorting logic inside our query and method of
item.exfile. - Include the sort mechanism on the Table
LiveComponentby adding a onclick event in the table header's - Add the event to sort on the
Stats LiveView - Create tests for everything
To add the sorting logic inside
item.exfile, we are going to create two parameters to our current method that fetches the stats. And we are going to validate the parameters as well.Open the
item.exfile and update to the following:... def person_with_item_and_timer_count( sort_column \\ :person_id, sort_order \\ :asc ) do sort_column = to_string(sort_column) sort_order = to_string(sort_order) sort_column = if validate_sort_column(sort_column), do: sort_column, else: "person_id" sort_order = if validate_order(sort_order), do: sort_order, else: "asc" sql = """ SELECT i.person_id, COUNT(distinct i.id) AS "num_items", COUNT(distinct t.id) AS "num_timers", MIN(i.inserted_at) AS "first_inserted_at", MAX(i.inserted_at) AS "last_inserted_at", SUM(EXTRACT(EPOCH FROM (t.stop - t.start))) AS "total_timers_in_seconds" FROM items i LEFT JOIN timers t ON t.item_id = i.id GROUP BY i.person_id ORDER BY #{sort_column} #{sort_order} """ ... # validates the items columns to make sure it's a valid column passed defp validate_sort_column(column) do Enum.member?( ~w(person_id num_items num_timers first_inserted_at last_inserted_at total_timers_in_seconds), column ) end # validates the order SQL to make sure it's a valid asc or desc defp validate_order(order) do Enum.member?( ~w(asc desc), order ) end endIn the
person_with_item_and_timer_count/2function, two default parameters have been introduced:sort_columnandsort_order. These parameters dictate which column the result should be sorted by and the direction of the sort, respectively.The default values (
:person_idfor column and:ascfor order) ensure that if no sorting criteria are provided when calling the function, it will default to sorting byperson_idin ascending order.To ensure that only valid column names and sorting orders are used in our SQL query (and to prevent potential SQL injection attacks), we need to validate these parameters:
sort_column = to_string(sort_column)
sort_order = to_string(sort_order)

sort_column =
  if validate_sort_column(sort_column), do: sort_column, else: "person_id"

sort_order = if validate_order(sort_order), do: sort_order, else: "asc"
Here, the
sort_columnandsort_orderparameters are first converted to strings. Then, thevalidate_sort_column/1andvalidate_order/1private functions are used to check if the provided values are valid. If they aren't, defaults are set.The SQL query has been modified to include an ORDER BY clause as well using string interpolation to insert the parameters on the query after validating them.
The private function
validate_sort_column/1andvalidate_order/1are similar, since they ensure that the provided column/order is one of the valid ones in our stats.The
~w(...)is a word list in Elixir, which creates a list of strings. TheEnum.member?/2function checks if the provided value exists in this list.By introducing these changes, you've made the
person_with_item_and_timer_count/2function more versatile, allowing it to retrieve sorted results based on provided criteria. Additionally, by validating the input parameters, you've added an essential layer of security to prevent potential misuse or attacks.Let's include now the sorting mechanism inside the TableComponent.
For that, we will create two template files that will be used as SVG with an arrow poiting up and another pointing down to include these on our table header's.
Create the following two files.
lib/app_web/templates/table_component/arrow_down.html.heex<span class="ml-2 flex-none rounded bg-gray-100 text-gray-900 group-hover:bg-gray-200" data-test-id="arrow_down" > <svg class="h-5 w-5" viewBox="0 0 20 20" fill="currentColor" aria-hidden="true" > <path fill-rule="evenodd" d="M5.23 7.21a.75.75 0 011.06.02L10 11.168l3.71-3.938a.75.75 0 111.08 1.04l-4.25 4.5a.75.75 0 01-1.08 0l-4.25-4.5a.75.75 0 01.02-1.06z" clip-rule="evenodd" /> </svg> </span>lib/app_web/templates/table_component/arrow_up.html.heex<%= if @invisible do %> <span class="invisible ml-2 flex-none rounded text-gray-400 group-hover:visible group-focus:visible" data-test-id="invisible_arrow_up" > <svg class="invisible ml-2 h-5 rotate-180 w-5 flex-none rounded text-gray-400 group-hover:visible group-focus:visible" viewBox="0 0 20 20" fill="currentColor" aria-hidden="true" > <path fill-rule="evenodd" d="M5.23 7.21a.75.75 0 011.06.02L10 11.168l3.71-3.938a.75.75 0 111.08 1.04l-4.25 4.5a.75.75 0 01-1.08 0l-4.25-4.5a.75.75 0 01.02-1.06z" clip-rule="evenodd" /> </svg> </span> <% else %> <span class="ml-2 flex-none rounded bg-gray-100 text-gray-900 group-hover:bg-gray-200" data-test-id="arrow_up" > <svg class="h-5 w-5 rotate-180" viewBox="0 0 20 20" fill="currentColor" aria-hidden="true" > <path fill-rule="evenodd" d="M5.23 7.21a.75.75 0 011.06.02L10 11.168l3.71-3.938a.75.75 0 111.08 1.04l-4.25 4.5a.75.75 0 01-1.08 0l-4.25-4.5a.75.75 0 01.02-1.06z" clip-rule="evenodd" /> </svg> </span> <% end %>These files are similar, the only difference is that the arrow_up will be invisible when there is no selection. We will create a method to deal with the show/hide of the arrows inside our
table_component_view.ex.Let's open this file and create the following methods:
defmodule AppWeb.TableComponentView do
  use AppWeb, :view

  def render_arrow_down() do
    Phoenix.View.render(AppWeb.TableComponentView, "arrow_down.html", %{})
  end

  def render_arrow_up() do
    Phoenix.View.render(AppWeb.TableComponentView, "arrow_up.html", %{
      invisible: false
    })
  end

  def render_arrow_up(:invisible) do
    Phoenix.View.render(AppWeb.TableComponentView, "arrow_up.html", %{
      invisible: true
    })
  end
end
There are three methods added to render arrow icons:
render_arrow_down/0: Renders a downward-pointing arrow, used to indicate descending sort order.render_arrow_up/0: Renders an upward-pointing arrow, used to indicate ascending sort order. By default, this arrow is visible.render_arrow_up/:invisible: An overloaded version of the above method, which renders the upward-pointing arrow but marks it as invisible.
The invisible attribute in the third method will be used as a conditional rendering in the
arrow_up.htmltemplate to hide the arrow when invisible is set totrue.Let's update our
table_component.html.heextemplate now, to include the arrows and the new Phoenix event that will be used to trigger the sorting mechanism.Open the
table_component.html.heexand make the following modifications:<table class="text-sm text-left text-gray-500 dark:text-gray-400 table-auto"> <thead class="text-xs text-gray-700 uppercase bg-gray-50 dark:bg-gray-700 dark:text-gray-400"> <%= for column <- @column do %> <th scope="col" class="px-6 py-3 text-center cursor-pointer" phx-click="sort" phx-value-key={column.key} > <a href="#" class="group inline-flex"> <%= column.label %> <%= if @sort_column == String.to_atom(column.key) do %> <%= if @sort_order == :asc do %> <%= render_arrow_up() %> <% else %> <%= render_arrow_down() %> <% end %> <% else %> <%= render_arrow_up(:invisible) %> <% end %> </a> </th> <% end %> </thead> ...The
phx-click="sort"attribute indicates that when a user clicks a header, the sort event will be triggered in the LiveView. Thephx-value-keysends the key of the column (like person_id, num_items, etc.) to the server as the value of the clicked item, that will be used for determining which column to sort by.<%= if @sort_column == String.to_atom(column.key) do %> <%= if @sort_order == :asc do %> <%= render_arrow_up() %> <% else %> <%= render_arrow_down() %> <% end %> <% else %> <%= render_arrow_up(:invisible) %> <% end %>This logic determines which arrow to display next to a column label:
- If the current sort column (
@sort_column) matches the column's key, it means this column is the one currently being sorted.- Within this condition, if the sort order (
@sort_order) is ascending (:asc), the upward-pointing arrow is displayed using therender_arrow_up()function. - If the sort order is not ascending, then the downward-pointing arrow is displayed using the
render_arrow_down()function.
- Within this condition, if the sort order (
- If the current sort column does not match the column's key, an upward-pointing arrow in an invisible state is displayed using
render_arrow_up(:invisible). This gives a visual cue to the user that they can click to sort by this column.
The additions to this file enhance the table by adding sortable column headers. When a user clicks on a column header, the table's content is re-ordered based on that column. The sort arrows provide a clear visual indication of the current sort column and its direction (ascending or descending).
Now, we just need to update our Stats LiveView to include this new variables and logic.
Open the
stats_live.exand update to the following code:defmodule AppWeb.StatsLive do ... def mount(_params, _session, socket) do # subscribe to the channel if connected?(socket), do: AppWeb.Endpoint.subscribe(@stats_topic) person_id = get_person_id(socket.assigns) metrics = Item.person_with_item_and_timer_count() {:ok, assign(socket, person_id: person_id, metrics: metrics, sort_column: :person_id, sort_order: :asc )} end ... @impl true def handle_event("sort", %{"key" => key}, socket) do sort_column = key |> String.to_atom() sort_order = if socket.assigns.sort_column == sort_column do toggle_sort_order(socket.assigns.sort_order) else :asc end metrics = Item.person_with_item_and_timer_count(sort_column, sort_order) {:noreply, assign(socket, metrics: metrics, sort_column: sort_column, sort_order: sort_order )} end ... defp toggle_sort_order(:asc), do: :desc defp toggle_sort_order(:desc), do: :asc endIn the
mount/3function, two new assigns are initialized:sort_columnandsort_order.sort_column: :person_id, sort_order: :ascsort_column: Represents the column on which the table is currently sorted. By default, it's set to:person_id.sort_order: Represents the order in which the table is currently sorted. By default, it's set to:asc(ascending).
A new function,
handle_event/3, has been added to handle the "sort" event, which is triggered when a user clicks on a table column header to sort by that column.def handle_event("sort", %{"key" => key}, socket) doThis function takes in an event payload with a key (the column to sort by) and the current socket.
- The provided key is converted to an atom to get the
sort_column. - The
sort_orderis determined using thetoggle_sort_order/1function. If the clicked column (sort_column) is the same as the one currently being sorted, the sort order is toggled (from ascending to descending or vice versa). If it's a different column, the sort order is set to ascending by default. - With the determined
sort_columnandsort_order, the function fetches the sorted metrics usingItem.person_with_item_and_timer_count/2. - Finally, the
socketis updated with the new metrics and sorting parameters.
A private helper function,
toggle_sort_order/1, has been introduced to toggle the sorting order:defp toggle_sort_order(:asc), do: :desc defp toggle_sort_order(:desc), do: :ascIf the current order is ascending (
:asc), it returns descending (:desc), and vice versa.These modifications enhance the
AppWeb.StatsLivemodule with dynamic sorting capabilities. Users can now click on table column headers to sort the table's content based on the chosen column, and the sort order will toggle between ascending and descending with each click.Finally, we need to update our usage of the Table LiveComponent for the usage of these new sort variables.
Open the
stats_live.html.heexfile and make the following modifications:... <.live_component module={AppWeb.TableComponent} id="table_component" rows={@metrics} sort_column={@sort_column} sort_order={@sort_order} highlight={&is_highlighted_person?(&1, @person_id)} > <:column :let={metric} label="Id" key="person_id"> <td class="px-6 py-4" data-test-id="person_id"> <a href={person_link(metric.person_id)}> <%= metric.person_id %> </a> </td> </:column> <:column :let={metric} label="Items" key="num_items"> <td class="px-6 py-4 text-center" data-test-id="num_items"> <%= metric.num_items %> </td> </:column> <:column :let={metric} label="Timers" key="num_timers"> <td class="px-6 py-4 text-center" data-test-id="num_timers"> <%= metric.num_timers %> </td> </:column> ...We are just passing the
sort_columnandsort_orderto the live component to be used internally for the arrow logic.Remember the
keyattribute that we created before? It's used to determine which column was clicked and to trigger the sort event.With that, we finished all of our tasks! Yay! Let's run the application and see our results:
mix sOur final modification will be create tests for everything, let's update all tests to test the new features:
test/app/item_test.exs... describe "items" do ... @another_person %{text: "some text", person_id: 2, status: 2} ... ... test "Item.person_with_item_and_timer_count/0 returns a list of count of timers and items for each given person" do ... assert first_element.num_items == 2 assert first_element.num_timers == 2 assert NaiveDateTime.compare( first_element.first_inserted_at, item1.inserted_at ) == :eq assert NaiveDateTime.compare( first_element.last_inserted_at, item2.inserted_at ) == :eq end test "Item.person_with_item_and_timer_count/1 returns a list sorted in ascending order" do {:ok, %{model: _, version: _version}} = Item.create_item(@valid_attrs) {:ok, %{model: _, version: _version}} = Item.create_item(@valid_attrs) {:ok, %{model: _, version: _version}} = Item.create_item(@another_person) {:ok, %{model: _, version: _version}} = Item.create_item(@another_person) # list person with number of timers and items result = Item.person_with_item_and_timer_count(:person_id) assert length(result) == 2 first_element = Enum.at(result, 0) assert first_element.person_id == 1 end test "Item.person_with_item_and_timer_count/1 returns a sorted list based on the column" do {:ok, %{model: _, version: _version}} = Item.create_item(@valid_attrs) {:ok, %{model: _, version: _version}} = Item.create_item(@valid_attrs) {:ok, %{model: _, version: _version}} = Item.create_item(@another_person) {:ok, %{model: _, version: _version}} = Item.create_item(@another_person) # list person with number of timers and items result = Item.person_with_item_and_timer_count(:person_id, :desc) assert length(result) == 2 first_element = Enum.at(result, 0) assert first_element.person_id == 2 end test "Item.person_with_item_and_timer_count/1 returns a sorted list by person_id if invalid sorted column and order" do {:ok, %{model: _, version: _version}} = Item.create_item(@valid_attrs) {:ok, %{model: _, version: _version}} = Item.create_item(@valid_attrs) {:ok, %{model: _, version: _version}} = Item.create_item(@another_person) {:ok, %{model: _, version: _version}} = Item.create_item(@another_person) # list person with number of timers and items result = Item.person_with_item_and_timer_count(:invalid_column, :invalid_order) assert length(result) == 2 first_element = Enum.at(result, 0) assert first_element.person_id == 1 end endtest/app_web/live/components/table_component_test.exsdefmodule AppWeb.TableComponentTest do use AppWeb.ConnCase, async: true alias AppWeb.TableComponent import Phoenix.LiveViewTest @column [ %{label: "Person Id", key: "person_id"}, %{label: "Num Items", key: "num_items"} ] test "renders table correctly" do component_rendered = render_component(TableComponent, column: @column, sort_column: :person_id, sort_order: :asc, rows: [] ) assert component_rendered =~ "Person Id" assert component_rendered =~ "Num Items" assert component_rendered =~ "person_id" assert component_rendered =~ "num_items" assert component_rendered =~ "arrow_up" assert component_rendered =~ "invisible_arrow_up" end test "renders table correctly with desc arrow" do component_rendered = render_component(TableComponent, column: @column, sort_column: :person_id, sort_order: :desc, rows: [] ) assert component_rendered =~ "Person Id" assert component_rendered =~ "Num Items" assert component_rendered =~ "person_id" assert component_rendered =~ "num_items" assert component_rendered =~ "arrow_down" assert component_rendered =~ "invisible_arrow_up" end endtest/app_web/live/stats_live_test.exsdefmodule AppWeb.StatsLiveTest do # alias App.DateTimeHelper use AppWeb.ConnCase, async: true alias App.{Item, Timer, DateTimeHelper} import Phoenix.LiveViewTest @person_id 55 test "disconnected and connected render", %{conn: conn} do {:ok, page_live, disconnected_html} = live(conn, "/stats") assert disconnected_html =~ "Stats" assert render(page_live) =~ "Stats" end test "display metrics on mount", %{conn: conn} do # Creating two items {:ok, %{model: item, version: _version}} = Item.create_item(%{text: "Learn Elixir", status: 2, person_id: @person_id}) {:ok, %{model: _item2, version: _version}} = Item.create_item(%{text: "Learn Elixir", status: 4, person_id: @person_id}) assert item.status == 2 # Creating one timer started = NaiveDateTime.utc_now() {:ok, timer} = Timer.start(%{item_id: item.id, start: started}) {:ok, _} = Timer.stop(%{id: timer.id}) {:ok, page_live, _html} = live(conn, "/stats") assert render(page_live) =~ "Stats" # two items and one timer expected assert page_live |> element("td[data-test-id=person_id_55]") |> render() =~ "55" assert page_live |> element("td[data-test-id=num_items_55]") |> render() =~ "2" assert page_live |> render() =~ "1" assert page_live |> element("td[data-test-id=first_inserted_at_55]") |> render() =~ DateTimeHelper.format_date(started) assert page_live |> element("td[data-test-id=last_inserted_at_55]") |> render() =~ DateTimeHelper.format_date(started) assert page_live |> element("td[data-test-id=total_timers_in_seconds_55]") |> render() =~ "" end test "handle broadcast when item is created", %{conn: conn} do # Creating an item {:ok, %{model: _item, version: _version}} = Item.create_item(%{text: "Learn Elixir", status: 2, person_id: @person_id}) {:ok, page_live, _html} = live(conn, "/stats") assert render(page_live) =~ "Stats" assert page_live |> element("td[data-test-id=num_items_55]") |> render() =~ "5" # Creating another item. AppWeb.Endpoint.broadcast( "stats", "item", {:create, payload: %{person_id: @person_id}} ) # num of items assert page_live |> element("td[data-test-id=num_items_55]") |> render() =~ "2" # Broadcasting update. Shouldn't effect anything in the page AppWeb.Endpoint.broadcast( "stats", "item", {:update, payload: %{person_id: @person_id}} ) # num of items assert page_live |> element("td[data-test-id=num_items_55]") |> render() =~ "2" end test "handle broadcast when timer is created", %{conn: conn} do # Creating an item {:ok, %{model: _item, version: _version}} = Item.create_item(%{text: "Learn Elixir", status: 2, person_id: @person_id}) {:ok, page_live, _html} = live(conn, "/stats") assert render(page_live) =~ "Stats" assert page_live |> element("td[data-test-id=num_timers_55]") |> render() =~ "0" # Creating a timer. AppWeb.Endpoint.broadcast( "stats", "timer", {:create, payload: %{person_id: @person_id}} ) assert page_live |> element("td[data-test-id=num_timers_55]") |> render() =~ "1" # Broadcasting update. Shouldn't effect anything in the page AppWeb.Endpoint.broadcast( "stats", "timer", {:update, payload: %{person_id: @person_id}} ) # num of timers assert page_live |> render() =~ "1" end test "add_row/3 adds 1 to row.num_timers" do row = %{person_id: 1, num_items: 1, num_timers: 1} payload = %{person_id: 1} # expect row.num_timers to be incremented by 1: row_updated = AppWeb.StatsLive.add_row(row, payload, :num_timers) assert row_updated == %{person_id: 1, num_items: 1, num_timers: 2} # no change expected: row2 = %{person_id: 2, num_items: 1, num_timers: 42} assert row2 == AppWeb.StatsLive.add_row(row2, payload, :num_timers) end test "sorting column when clicked", %{conn: conn} do {:ok, %{model: _, version: _version}} = Item.create_item(%{text: "Learn Elixir", status: 2, person_id: 1}) {:ok, %{model: _, version: _version}} = Item.create_item(%{text: "Learn Elixir", status: 4, person_id: 2}) {:ok, page_live, _html} = live(conn, "/stats") # sort first time result = page_live |> element("th[phx-value-key=person_id]") |> render_click() [first_element | _] = Floki.find(result, "td[data-test-id=person_id_2]") assert first_element |> Floki.text() =~ "2" # sort second time result = page_live |> element("th[phx-value-key=person_id]") |> render_click() [first_element | _] = Floki.find(result, "td[data-test-id=person_id_1]") assert first_element |> Floki.text() =~ "1" end endLet's run the tests:
mix tThat's it! I'll let the tests file for you to explore and test different cases if you want.
Congratulations!
Implementing Enhanced Tag Details and Sorting
These modifications are designed to enhance functionality and improve user experience. We'll cover updates made to the
Repomodule, changes in theTagschema, alterations in theTagControllerandStatsLivemodules, and updates to LiveView files.Implementing the
toggle_sort_orderinRepo.exThe
toggle_sort_orderfunction in theRepomodule allows us to dynamically change the sorting order of our database queries. This is useful for features where the user can sort items in ascending or descending order that will be used throughout the whole app where we need to sort it.lib/app/repo.exdef toggle_sort_order(:asc), do: :desc def toggle_sort_order(:desc), do: :ascIf the current order is :asc (ascending), it changes to :desc (descending), and vice versa.
Extending the
TagModelOpen
lib/app/tag.exand add new fields to theTagschema.field :last_used_at, :naive_datetime, virtual: true field :items_count, :integer, virtual: true field :total_time_logged, :integer, virtual: trueThese fields are 'virtual', meaning they're not stored in the database but calculated on the fly.
The purposes of the fields are:
last_used_at: the date a Tag was last useditems_count: how many items are using the Tagtotal_time_logged: the total time that was logged with this particular Tag being used by a ItemWe will add a new method that will query with these new fields on the same file.
Define
list_person_tags_complete/3:def list_person_tags_complete( person_id, sort_column \\ :text, sort_order \\ :asc ) do sort_column = if validate_sort_column(sort_column), do: sort_column, else: :text Tag |> where(person_id: ^person_id) |> join(:left, [t], it in ItemTag, on: t.id == it.tag_id) |> join(:left, [t, it], i in Item, on: i.id == it.item_id) |> join(:left, [t, it, i], tm in Timer, on: tm.item_id == i.id) |> group_by([t], t.id) |> select([t, it, i, tm], %{ t | last_used_at: max(it.inserted_at), items_count: fragment("count(DISTINCT ?)", i.id), total_time_logged: sum( coalesce( fragment( "EXTRACT(EPOCH FROM (? - ?))", tm.stop, tm.start ), 0 ) ) }) |> order_by(^get_order_by_keyword(sort_column, sort_order)) |> Repo.all() endAnd add these new methods at the end of the file:
defp validate_sort_column(column) do
  Enum.member?(
    [
      :text,
      :color,
      :created_at,
      :last_used_at,
      :items_count,
      :total_time_logged
    ],
    column
  )
end

defp get_order_by_keyword(sort_column, :asc) do
  [asc: sort_column]
end

defp get_order_by_keyword(sort_column, :desc) do
  [desc: sort_column]
end
These methods are used in the previous method to validate the columns that can be searched and to transform into keywords [asc: column] to work on the query.
Adding the new columns on the
TagsPageFirst, we need to remove the index page from the
tag_controller.exbecause we are going to include it on a new LiveView forTags.This is needed because of the sorting events of the table.
So remove these next lines of code from the
lib/app_web/controllers/tag_controller.exdef index(conn, _params) do person_id = conn.assigns[:person][:id] || 0 tags = Tag.list_person_tags(person_id) render(conn, "index.html", tags: tags, lists: App.List.get_lists_for_person(person_id), custom_list: false ) endNow, let's create the LiveView that will have the table for tags and the redirections to all other pages on the
TagController.Create a new file on
lib/app_web/live/tags_live.exwith the following content.defmodule AppWeb.TagsLive do use AppWeb, :live_view alias App.{DateTimeHelper, Person, Tag, Repo} # run authentication on mount on_mount(AppWeb.AuthController) @tags_topic "tags" @impl true def mount(_params, _session, socket) do if connected?(socket), do: AppWeb.Endpoint.subscribe(@tags_topic) person_id = Person.get_person_id(socket.assigns) tags = Tag.list_person_tags_complete(person_id) {:ok, assign(socket, tags: tags, lists: App.List.get_lists_for_person(person_id), custom_list: false, sort_column: :text, sort_order: :asc )} end @impl true def handle_event("sort", %{"key" => key}, socket) do sort_column = key |> String.to_atom() sort_order = if socket.assigns.sort_column == sort_column do Repo.toggle_sort_order(socket.assigns.sort_order) else :asc end person_id = Person.get_person_id(socket.assigns) tags = Tag.list_person_tags_complete(person_id, sort_column, sort_order) {:noreply, assign(socket, tags: tags, sort_column: sort_column, sort_order: sort_order )} end def format_date(date) do DateTimeHelper.format_date(date) end def format_seconds(seconds) do DateTimeHelper.format_duration(seconds) end endThe whole code is similar to other LiveViews created on the project.
mountThis function is invoked when the LiveView component is mounted. It initializes the state of the LiveView.
on_mount(AppWeb.AuthController): This line ensures that authentication is run when the LiveView component mounts.- The
if connected?(socket)block subscribes to a topic (@tags_topic) if the user is connected, enabling real-time updates. person_idis retrieved to identify the current user.- tags are fetched using
Tag.list_person_tags_complete(person_id), which retrieves all tags associated with theperson_idand is the method that we created previously. - The socket is assigned various values, such as tags, lists, custom_list, sort_column, and sort_order, setting up the initial state of the LiveView.
handle_eventThis function is called when a "sort" event is triggered by user interaction on the UI.
sort_columnis set based on the event's key, determining which column to sort by.sort_orderis determined by the current state of sort_column and sort_order. If the sort_column is the same as the one already in the socket's assigns, the order is toggled usingRepo.toggle_sort_order. Otherwise, it defaults to ascending (:asc).- Tags are then re-fetched with the new sort order and column, and the socket is updated with these new values.
- This dynamic sorting mechanism allows the user interface to update the display order of tags based on user interaction.
format_date(date)Uses DateTimeHelper.format_date to format a given date.
format_seconds(seconds)Uses DateTimeHelper.format_duration to format a duration in seconds into a more human-readable format.
Creating the LiveView HTML template
Create a new file on
lib/app_web/live/tags_live.html.heexthat will handle the LiveView created in the previous section:<main class="font-sans container mx-auto"> <div class="relative overflow-x-auto mt-12"> <h1 class="mb-2 text-xl font-extrabold leading-none tracking-tight text-gray-900 md:text-5xl lg:text-6xl dark:text-white"> Listing Tags </h1> <.live_component module={AppWeb.TableComponent} id="tags_table_component" rows={@tags} sort_column={@sort_column} sort_order={@sort_order} highlight={fn _ -> false end} > <:column :let={tag} label="Name" key="text"> <td class="px-6 py-4 text-center" data-test-id={"text_#{tag.id}"}> <%= tag.text %> </td> </:column> <:column :let={tag} label="Color" key="color"> <td class="px-6 py-4 text-center" data-test-id={"color_#{tag.id}"}> <span style={"background-color:#{tag.color}"} class="max-w-[144px] text-white font-bold py-1 px-2 rounded-full overflow-hidden text-ellipsis whitespace-nowrap inline-block" > <%= tag.color %> </span> </td> </:column> <:column :let={tag} label="Created At" key="inserted_at"> <td class="px-6 py-4 text-center" data-test-id={"inserted_at_#{tag.id}"}> <%= format_date(tag.inserted_at) %> </td> </:column> <:column :let={tag} label="Latest" key="last_used_at"> <td class="px-6 py-4 text-center" data-test-id={"last_used_at_#{tag.id}"} > <%= if tag.last_used_at do %> <%= format_date(tag.last_used_at) %> <% else %> - <% end %> </td> </:column> <:column :let={tag} label="Items Count" key="items_count"> <td class="px-6 py-4 text-center" data-test-id={"items_count_#{tag.id}"}> <a href={~p"/?filter_by_tag=#{tag.text}"} class="underline"> <%= tag.items_count %> </a> </td> </:column> <:column :let={tag} label="Total Time Logged" key="total_time_logged"> <td class="px-6 py-4 text-center" data-test-id={"total_time_logged_#{tag.id}"} > <%= format_seconds(tag.total_time_logged) %> </td> </:column> <:column :let={tag} label="Actions" key="actions"> <td class="px-6 py-4 text-center" data-test-id={"actions_#{tag.id}"}> <%= link("Edit", to: Routes.tag_path(@socket, :edit, tag)) %> <span class="text-red-500 ml-10"> <%= link("Delete", to: Routes.tag_path(@socket, :delete, tag), method: :delete, data: [confirm: "Are you sure you want to delete this tag?"] ) %> </span> </td> </:column> </.live_component> <.button link_type="a" to={Routes.tag_path(@socket, :new)} label="Create Tag" class="text-2xl text-center float-left rounded-md bg-green-600 hover:bg-green-700 my-2 mt-2 ml-2 px-4 py-2 font-semibold text-white shadow-sm" /> </div> </main>The structure is similar to the
stats_live.html.heexwith the new columns for tags and the events for sorting. And it's using theTableComponentas well.Adding the new page to the router
Open the
lib/app_web/router.exand change the following line:... scope "/", AppWeb do pipe_through [:browser, :authOptional] live "/", AppLive resources "/lists", ListController, except: [:show] get "/logout", AuthController, :logout live "/stats", StatsLive + live "/tags", TagsLive resources "/tags", TagController, except: [:show] end ...After that, you can remove the
lib/app_web/templates/tag/index.html.heexfile, since we will use theTagsLiveView for the tags page now.Done! The Tags Page has the new columns and everything to be enhanced, congratulations!
It's just missing tests, let's add them:
test/app/repo_test.exsdefmodule App.RepoTest do use ExUnit.Case alias App.Repo describe "toggle_sort_order/1" do test "toggles :asc to :desc" do assert Repo.toggle_sort_order(:asc) == :desc end test "toggles :desc to :asc" do assert Repo.toggle_sort_order(:desc) == :asc end end endAdd new test cases to the
test/app/tag_test.exsdescribe "list_person_tags/1" do test "returns an empty list for a person with no tags" do assert [] == Tag.list_person_tags(-1) end test "returns a single tag for a person with one tag" do tag = add_test_tag(%{text: "TestTag", person_id: 1, color: "#FCA5A5"}) assert [tag] == Tag.list_person_tags(1) end test "returns tags in alphabetical order for a person with multiple tags" do add_test_tag(%{text: "BTag", person_id: 2, color: "#FCA5A5"}) add_test_tag(%{text: "ATag", person_id: 2, color: "#FCA5A5"}) tags = Tag.list_person_tags(2) assert length(tags) == 2 assert tags |> Enum.map(& &1.text) == ["ATag", "BTag"] end end describe "list_person_tags_complete/3" do test "returns detailed tag information for a given person" do add_test_tag_with_details(%{person_id: 3, text: "DetailedTag", color: "#FCA5A5"}) tags = Tag.list_person_tags_complete(3) assert length(tags) > 0 assert tags |> Enum.all?(&is_map(&1)) assert tags |> Enum.all?(&Map.has_key?(&1, :last_used_at)) assert tags |> Enum.all?(&Map.has_key?(&1, :items_count)) assert tags |> Enum.all?(&Map.has_key?(&1, :total_time_logged)) end test "sorts tags based on specified sort_column and sort_order" do add_test_tag_with_details(%{person_id: 4, text: "CTag", color: "#FCA5A5"}) add_test_tag_with_details(%{person_id: 4, text: "ATag", color: "#FCA5A5"}) add_test_tag_with_details(%{person_id: 4, text: "BTag", color: "#FCA5A5"}) tags = Tag.list_person_tags_complete(4, :text, :asc) assert tags |> Enum.map(& &1.text) == ["ATag", "BTag", "CTag"] end test "sorts tags with desc sort_order" do add_test_tag_with_details(%{person_id: 4, text: "CTag", color: "#FCA5A5"}) add_test_tag_with_details(%{person_id: 4, text: "ATag", color: "#FCA5A5"}) add_test_tag_with_details(%{person_id: 4, text: "BTag", color: "#FCA5A5"}) tags = Tag.list_person_tags_complete(4, :text, :desc) assert tags |> Enum.map(& &1.text) == ["CTag", "BTag", "ATag"] end test "uses default sort_order when none are provided" do add_test_tag_with_details(%{person_id: 5, text: "SingleTag", color: "#FCA5A5"}) tags = Tag.list_person_tags_complete(5, :text) assert length(tags) == 1 end test "uses default parameters when none are provided" do add_test_tag_with_details(%{person_id: 5, text: "SingleTag", color: "#FCA5A5"}) tags = Tag.list_person_tags_complete(5) assert length(tags) == 1 end test "handles invalid column" do add_test_tag_with_details(%{person_id: 6, text: "BTag", color: "#FCA5A5"}) add_test_tag_with_details(%{person_id: 6, text: "AnotherTag", color: "#FCA5A5"}) tags = Tag.list_person_tags_complete(6, :invalid_column) assert length(tags) == 2 assert tags |> Enum.map(& &1.text) == ["AnotherTag", "BTag"] end end defp add_test_tag(attrs) do {:ok, tag} = Tag.create_tag(attrs) tag end defp add_test_tag_with_details(attrs) do tag = add_test_tag(attrs) {:ok, %{model: item}} = Item.create_item(%{ person_id: tag.person_id, status: 0, text: "some item", tags: [tag] }) seconds_ago_date = NaiveDateTime.new(Date.utc_today(), Time.add(Time.utc_now(), -10)) Timer.start(%{item_id: item.id, person_id: tag.person_id, start: seconds_ago_date}) Timer.stop_timer_for_item_id(item.id) tag endRemove these next lines from the
tag_controller_test.exssince we don't have this page anymore:describe "index" do test "lists all tags", %{conn: conn} do conn = get(conn, Routes.tag_path(conn, :index)) assert html_response(conn, 200) =~ "Listing Tags" end test "lists all tags and display logout button", %{conn: conn} do conn = conn |> assign(:jwt, AuthPlug.Token.generate_jwt!(%{id: 1, picture: ""})) |> get(Routes.tag_path(conn, :index)) assert html_response(conn, 200) =~ "logout" end endtest/app_web/live/tags_live_test.exsdefmodule AppWeb.TagsLiveTest do use AppWeb.ConnCase, async: true alias App.{Item, Timer, Tag} import Phoenix.LiveViewTest @person_id 0 test "disconnected and connected render", %{conn: conn} do {:ok, page_live, disconnected_html} = live(conn, "/tags") assert disconnected_html =~ "Tags" assert render(page_live) =~ "Tags" end test "display tags on table", %{conn: conn} do tag1 = add_test_tag_with_details(%{person_id: @person_id, text: "Tag1", color: "#000000"}) tag2 = add_test_tag_with_details(%{person_id: @person_id, text: "Tag2", color: "#000000"}) tag3 = add_test_tag_with_details(%{person_id: @person_id, text: "Tag3", color: "#000000"}) {:ok, page_live, _html} = live(conn, "/tags") assert render(page_live) =~ "Tags" assert page_live |> element("td[data-test-id=text_#{tag1.id}") |> render() =~ "Tag1" assert page_live |> element("td[data-test-id=text_#{tag2.id}") |> render() =~ "Tag2" assert page_live |> element("td[data-test-id=text_#{tag3.id}") |> render() =~ "Tag3" end @tag tags: true test "sorting column when clicked", %{conn: conn} do add_test_tag_with_details(%{person_id: @person_id, text: "a", color: "#000000"}) add_test_tag_with_details(%{person_id: @person_id, text: "z", color: "#000000"}) {:ok, page_live, _html} = live(conn, "/tags") # sort first time result = page_live |> element("th[phx-value-key=text]") |> render_click() [first_element | _] = Floki.find(result, "td[data-test-id^=text_]") assert first_element |> Floki.text() =~ "z" # sort second time result = page_live |> element("th[phx-value-key=text]") |> render_click() [first_element | _] = Floki.find(result, "td[data-test-id^=text_]") assert first_element |> Floki.text() =~ "a" end defp add_test_tag_with_details(attrs) do {:ok, tag} = Tag.create_tag(attrs) {:ok, %{model: item}} = Item.create_item(%{ person_id: tag.person_id, status: 0, text: "some item", tags: [tag] }) seconds_ago_date = NaiveDateTime.new(Date.utc_today(), Time.add(Time.utc_now(), -10)) Timer.start(%{item_id: item.id, person_id: tag.person_id, start: seconds_ago_date}) Timer.stop_timer_for_item_id(item.id) tag end endAfter these tests, you are ready to run the application and see your new changes!
# `tidy`The app to help you
tidyyour life.The reasoning for creating this mini-app is simple: clutter costs us cash because it wastes time. Having an untidy home prevents us from living our "best life". So we want to fix the problem systematically.
More detailed background/reasoning in: dwyl/tidy
Here we are only documenting how we built it!
Our guiding wireframes for this mini project were:
We will refer back to these in the next few pages.
Create
tidyApp!These are the steps we took when creating the
tidyApp. You can follow along at your own pace.If you feel we have skipped a step or anything is unclear, please open an issue.
1. Create a New Phoenix App
Create a New Phoenix App:
mix phx.new tidy --no-mailer --no-dashboard --no-gettextNote: The "flags" (e.g:
--no-mailer) after thetidyapp name are there to avoid adding bloat to our app. We don't need to sendemail, have a fancydashboardortranslationin thisdemo. All these advanced features are all covered in other chapters.2. Setup Coverage
So that we know which files are covered by tests, we setup coverage following the steps outlined in: /dwyl/phoenix-chat-example#13-what-is-not-tested
Note: This is the first thing we add to all new
Elixir/Phoenixprojects because it lets us see what is not being tested. 🙈 It's just a good engineering discipline/habit to get done; a hygiene factor like brushing your teeth. 🪥With that setup we can now run:
mix cWe see output similar to the following:
.....
Finished in 0.07 seconds (0.03s async, 0.04s sync)
5 tests, 0 failures

Randomized with seed 679880
----------------
COV    FILE                                        LINES RELEVANT   MISSED
  0.0% lib/fields_demo.ex                              9        0        0
 75.0% lib/tidy/application.ex                 36        4        1
  0.0% lib/tidy/repo.ex                         5        0        0
100.0% lib/tidy_web.ex                        111        2        0
 15.9% lib/tidy_web/components/core_comp      661      151      127
  0.0% lib/tidy_web/components/layouts.e        5        0        0
100.0% lib/tidy_web/controllers/error_ht       19        1        0
100.0% lib/tidy_web/controllers/error_js       15        1        0
100.0% lib/tidy_web/controllers/page_con        9        1        0
  0.0% lib/tidy_web/controllers/page_htm        5        0        0
  0.0% lib/tidy_web/endpoint.ex                47        0        0
 66.7% lib/tidy_web/router.ex                  27        3        1
 80.0% lib/tidy_web/telemetry.ex               92        5        1
100.0% test/support/conn_case.ex                      38        2        0
 28.6% test/support/data_case.ex                      58        7        5
[TOTAL]  23.7%
----------------
Not great. But most of the untested code is in:
lib/tidy_web/components/core_components.exwhich has661lines and we aren't going to use in this project ...2.1 Ignore Unused "System" Files
Create a file with called
coveralls.jsonand add the following contents:{ "coverage_options": { "minimum_coverage": 100 }, "skip_files": [ "lib/tidy/application.ex", "lib/tidy_web/components/core_components.ex", "lib/tidy_web/telemetry.ex", "test/" ] }Save the file. This sets
100%coverage as our minimum/baseline and ignores the files we aren't reaching with our tests.Re-run:
mix cAnd you should see the following output:
.....
Finished in 0.05 seconds (0.01s async, 0.04s sync)
5 tests, 0 failures

Randomized with seed 253715
----------------
COV    FILE                                        LINES RELEVANT   MISSED
100.0% lib/fields_demo.ex                              9        0        0
100.0% lib/tidy/repo.ex                         5        0        0
100.0% lib/tidy_web.ex                        111        2        0
100.0% lib/tidy_web/components/layouts.e        5        0        0
100.0% lib/tidy_web/controllers/error_ht       19        1        0
100.0% lib/tidy_web/controllers/error_js       15        1        0
100.0% lib/tidy_web/controllers/page_con        9        1        0
100.0% lib/tidy_web/controllers/page_htm        5        0        0
100.0% lib/tidy_web/endpoint.ex                47        0        0
100.0% lib/tidy_web/router.ex                  23        2        0
[TOTAL] 100.0%
----------------
Now we can move on!
3. Run the Phoenix App!
Before we start adding features, let's run the default
PhoenixApp. In your terminal, run:mix setup mix phx.serverTip: we always create an alias for
mix phx.serverasmix sThe alias will be used for the remainder of this chapter.With the
Phoenixserver running, visit localhost:4000 in your web browser, you should see something similar to the following:That completes 2 minutes of "setup". Let's add a
schemato store the data!Create Schemas
As outlined in tidy#1, our goal is to allow
peoplewanting to helptidythe house, to create the records.ObjectSchemaAn
objectwill have the following fields:name- the name of theobjectyou need help withdesc- brief description of theobjectincluding any salient features.color- astringfor main color of theobjecte.g. "green"person_id- theidof thepersonwho created theobjectrecord.owner_id-idof thepersonwho owns theobjectlocation- astringdescribing where theobjectbelongs.status- aintrepresenting the currentstatusof theobjectrecord.
Note: we will need to map out the
statusesrequired for this App and add them to our list.Using the
mix phx.gen.livecommand, we can create theobjectschema andLiveViewpages, run:mix phx.gen.live Objects Object objects name:binary desc:binary color:binary person_id:integer owner_id:integer location:binary status:integerYou should expect to see output similar to the following:
* creating lib/tidy_web/live/object_live/show.ex
* creating lib/tidy_web/live/object_live/index.ex
* creating lib/tidy_web/live/object_live/form_component.ex
* creating lib/tidy_web/live/object_live/index.html.heex
* creating lib/tidy_web/live/object_live/show.html.heex
* creating test/tidy_web/live/object_live_test.exs
* creating lib/tidy/objects/object.ex
* creating priv/repo/migrations/20231004034411_create_objects.exs
* creating lib/tidy/objects.ex
* injecting lib/tidy/objects.ex
* creating test/tidy/objects_test.exs
* injecting test/tidy/objects_test.exs
* creating test/support/fixtures/objects_fixtures.ex
* injecting test/support/fixtures/objects_fixtures.ex

Add the live routes to your browser scope in lib/tidy_web/router.ex:

    live "/objects", ObjectLive.Index, :index
    live "/objects/new", ObjectLive.Index, :new
    live "/objects/:id/edit", ObjectLive.Index, :edit

    live "/objects/:id", ObjectLive.Show, :show
    live "/objects/:id/show/edit", ObjectLive.Show, :edit


Remember to update your repository by running migrations:

    $ mix ecto.migrate
Those are a lot of new files. 😬 We will go through each file in the next page and update as needed. For now we need to follow the instructions and add the new routes to the
router.ex.With the new lines added e.g: router.ex
If we re-run the tests with coverage checking:
mix cWe see the following output:
...................
Finished in 0.2 seconds (0.08s async, 0.1s sync)
19 tests, 0 failures

Randomized with seed 121378
----------------
COV    FILE                                        LINES RELEVANT   MISSED
100.0% lib/tidy.ex                                     9        0        0
100.0% lib/tidy/objects.ex                           104        6        0
100.0% lib/tidy/objects/object.ex                     23        2        0
100.0% lib/tidy/repo.ex                                5        0        0
100.0% lib/tidy_web.ex                               111        2        0
100.0% lib/tidy_web/components/layouts.ex              5        0        0
100.0% lib/tidy_web/controllers/error_html.ex         19        1        0
100.0% lib/tidy_web/controllers/error_json.ex         15        1        0
100.0% lib/tidy_web/controllers/page_controller        9        1        0
100.0% lib/tidy_web/controllers/page_html.ex           5        0        0
100.0% lib/tidy_web/endpoint.ex                       47        0        0
 94.1% lib/tidy_web/live/object_live/form_compo       96       34        2
100.0% lib/tidy_web/live/object_live/index.ex         47       10        0
100.0% lib/tidy_web/live/object_live/show.ex          21        5        0
100.0% lib/tidy_web/router.ex                         35        7        0
[TOTAL]  97.1%
----------------
FAILED: Expected minimum coverage of 100%, got 97.1%.
The
lib/tidy_web/live/object_live/form_component.exhas a few lines that are not reached by the default tests:Both of these functions are
defpi.e. "private". So we cannot simply invoke them in a unit test to exercise the error handling.We have several options for dealing with these untested lines:
- Ignore them - the easiest/fastest
- Convert them from
defptodefand test (invoke) them directly - Construct elaborate tests with bad data to trigger the errors ...
In our case we know that we won't be using these functions when we build our custom interface, so we're just going to ignore the untested lines, for now.
E.g:
lib/tidy_web/live/object_live/form_component.exRef: tidy#1Now re-running the tests with coverage
mix cwe get:Finished in 0.2 seconds (0.05s async, 0.1s sync) 19 tests, 0 failures Randomized with seed 729041 ---------------- COV FILE LINES RELEVANT MISSED 100.0% lib/tidy.ex 9 0 0 100.0% lib/tidy/objects.ex 104 6 0 100.0% lib/tidy/objects/object.ex 23 2 0 100.0% lib/tidy/repo.ex 5 0 0 100.0% lib/tidy_web.ex 111 2 0 100.0% lib/tidy_web/components/layouts.ex 5 0 0 100.0% lib/tidy_web/controllers/error_html.ex 19 1 0 100.0% lib/tidy_web/controllers/error_json.ex 15 1 0 100.0% lib/tidy_web/controllers/page_controller 9 1 0 100.0% lib/tidy_web/controllers/page_html.ex 5 0 0 100.0% lib/tidy_web/endpoint.ex 47 0 0 100.0% lib/tidy_web/live/object_live/form_compo 98 32 0 100.0% lib/tidy_web/live/object_live/index.ex 47 10 0 100.0% lib/tidy_web/live/object_live/show.ex 21 5 0 100.0% lib/tidy_web/router.ex 34 7 0 [TOTAL] 100.0% ----------------With that out of the way, let's proceed to defining the
imagesschema.imagesAn
objectcan have one or moreimages. These are used identify and categorize theobject.obj_id- theidof theobjecttheimagebelongs to.person_id-idof thepersonwho uploaded theimage.url- theURLof theimagethat was uploaded toS3
In the case of images we don't want any "pages" to be created, we just want the
schema, so we use themix phx.gen.schemacommand:mix phx.gen.schema Image images obj_id:integer person_id:integer url:binaryOutput should be similar to:
* creating lib/tidy/image.ex
* creating priv/repo/migrations/20231004055222_create_images.exs

Remember to update your repository by running migrations:

    $ mix ecto.migrate
This is a far more manageable 2 files. But in this case the tests are not generated. So if we run
mix cwe get:19 tests, 0 failures Randomized with seed 852972 ---------------- COV FILE LINES RELEVANT MISSED 100.0% lib/tidy.ex 9 0 0 0.0% lib/tidy/image.ex 19 2 2 100.0% lib/tidy/objects.ex 104 6 0 ... etc. [TOTAL] 97.1% ---------------- FAILED: Expected minimum coverage of 100%, got 97.1%.Where the
lib/tidy/image.exfile has0%coverage.This is easy to fix.
Test
imagesSchemaCreate a file with the path:
test/tidy/image_test.exsand add the following test to it:defmodule TidyWeb.ImageTest do use Tidy.DataCase alias Tidy.Image describe "images" do @valid_image %{obj_id: 1, person_id: 1, url: "https://imgur.com/gallery/odNLFdO"} test "create_image/1 with valid data creates an image" do assert {:ok, %Image{} = image} = Image.create_image(@valid_image) assert image.url == @valid_image.url end end endWith that test in place, we can now re-run
mix cand see that we're back up to100%coverage:20 tests, 0 failures Randomized with seed 236415 ---------------- COV FILE LINES RELEVANT MISSED 100.0% lib/tidy.ex 9 0 0 100.0% lib/tidy/image.ex 39 3 0 100.0% lib/tidy/objects.ex 104 6 0 ... etc. [TOTAL] 100.0% # ----------------Time for the
commentsschema!commentsAn
objectcan have one ore morecommentsassociated with it. This allowspeopleto discuss theobjectin a conversational style similar to what they are already used to from using Instant Messaging.The data/fields we need to store for each
commentare:obj_id- theidof theobjectthecommentbelongs to.person_id-idof thepersoncommenter.text- thestringof their comment.
Again using the
mix phx.gen.schemacommand:mix phx.gen.schema Comment comments obj_id:integer person_id:integer text:binaryOutput should be similar to:
* creating lib/tidy/comment.ex
* creating priv/repo/migrations/20231004142856_create_comments.exs

Remember to update your repository by running migrations:

    $ mix ecto.migrate
Same as with the
imagesabove, no tests are created, so if we runmix cwe get:20 tests, 0 failures Randomized with seed 986302 ---------------- COV FILE LINES RELEVANT MISSED 100.0% lib/tidy.ex 9 0 0 0.0% lib/tidy/comment.ex 19 2 2 100.0% lib/tidy/image.ex 39 3 0 100.0% lib/tidy/objects.ex 104 6 0 ... etc. [TOTAL] 97.2% ---------------- FAILED: Expected minimum coverage of 100%, got 97.2%.Test
commentSchemaCreate a file with the path:
test/tidy/comment_test.exsand add the following test to it:defmodule TidyWeb.CommentTest do use Tidy.DataCase alias Tidy.Comment describe "comments" do @valid_attrs %{obj_id: 1, person_id: 1, text: "Candles on the kitchen counter"} test "create_comment/1 with valid data creates an comment" do assert {:ok, %Comment{} = com} = Comment.create_comment(@valid_attrs) assert com.text == @valid_attrs.text end end endWith that test in place, we can now re-run
mix cand see that we're back up to100%coverage:20 tests, 0 failures Randomized with seed 236415 ---------------- COV FILE LINES RELEVANT MISSED 100.0% lib/tidy.ex 9 0 0 100.0% lib/tidy/comment.ex 40 3 0 100.0% lib/tidy/image.ex 39 3 0 100.0% lib/tidy/objects.ex 104 6 0 ... etc. [TOTAL] 100.0% # ----------------With all the schemas & functions tested, we can now move on to the interface! 🪄
- The body () of the table is dynamically generated based on the